VCF Automation – Build Tools for VMware Aria – Overview of VCF Automation Projects
The Build Tools for VMware Aria support a variety of project types. In this post, I’ll focus on those relevant to managing VCF Automation and VCF Automation Orchestrator content. I’ll explain the purpose of each project type, offer guidance on when to use each based on your use case, and provide example commands to help you create them.
First, let’s take a look at the list of available project types:
- vRO TypeScript-based
- vRO JavaScript-based
- vRO XML-based
- vRO Mixed
- vRA 8.x
If you are not familiar with the old product acronyms:
vRA = VCF Automation
vRO = VCF Operations Orchestrator.
There are also two legacy project types, but I will not be covering these in this post.
- vRA 7.x
- vRA 7.x and vRO
Page Contents
Project Types
The following sections provide examples of the different project types that can be created. Please note that the ‘archetypeVersion‘ variable used in these examples was the version of the Build Tools at the time of writing. Please check the GitHub project if a new version is available, as it’s recommended to use the latest.
I recommend creating a root folder to store the project(s). In my examples, I use the root folder ‘aria-automation‘.
vRO TypeScript-based Project
This will create a TypeScript project that allows VCF Operations Orchestrator content to be developed and managed like a modern JavaScript project using many of the ECMAScript 6-supported features, module dependencies, class inheritance, and much more.
Workflows, Actions, Configurations, and Resources can all be managed using this project and are developed as .ts files in the native TypeScript language. This has the advantage of managing all Orchestrator content in a single place using the same language.
This project type requires a good level of JavaScript and TypeScript knowledge and has some important points to consider:
- Code written in TypeScript is converted back to JavaScript during build time. This means that content cannot be ‘pulled’ from the Orchestrator server as there is no mechanism to convert the native JavaScript code to TypeScript;
- All development must be made in the user’s development environment (i.e. locally using an IDE). This is related to the previous point and also because of the way the JavaScript code is converted and presented on the Orchestrator server;
- Pushing code to the Orchestrator server can be significant due to the node dependencies that are required;
- Requires Types/Interfaces to be defined that could massively increase initial delivery times;
Despite these points, this is a great project type if you have TypeScript experience that allows you to truly manage Orchestrator content as an application.
Create a vRO TypeScript-based Project Example
mvn archetype:generate -DinteractiveMode=false -DarchetypeGroupId=com.vmware.pscoe.o11n.archetypes -DarchetypeArtifactId=package-typescript-archetype -DarchetypeVersion=4.7.0 -DgroupId=com.simplygeek -DartifactId=vro-ts
Set ‘groupId‘ and ‘artifactId‘ to your values.
Once complete, you should see a new folder with the name of what artifactId was set to (vro-ts in my example).
In the new folder, under ‘src‘, you should have a folder structure like the following:
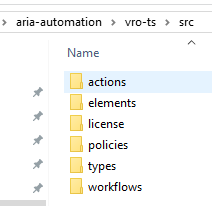
Additional folders can be created and referenced using the ‘Import‘ keyword within Actions and Workflows.
vRO JavaScript-based Project
In Orchestrator, all content, including Actions, is stored in XML format. Actions themselves are simply JavaScript functions wrapped in XML, which makes native development cumbersome and limits the ability to leverage modern development tools.
The JavaScript-based project type solves this by enabling you to write Orchestrator Actions in pure JavaScript, stored as standard .js files. The Build Tools handle the background conversion of these files into the XML format required by Orchestrator, allowing you to work entirely in JavaScript while maintaining full compatibility with the platform.
Note that only Orchestrator Actions are supported by this project type (Workflows, Configurations and Resources are not supported).
Create a vRO JavaScript-based Project Example
mvn archetype:generate -DinteractiveMode=false -DarchetypeGroupId=com.vmware.pscoe.o11n.archetypes -DarchetypeArtifactId=package-actions-archetype -DarchetypeVersion=4.7.0 -DgroupId=com.simplygeek -DartifactId=vro-js
Set ‘groupId‘ and ‘artifactId‘ to your values.
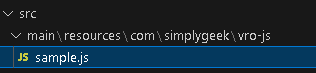
Once complete, you should see a new folder named after the artifactId (vro-js in my example). Within this folder, there will be a sample function in the path ‘src\main\resources\com\simplygeek\vro-js‘ where ‘com\simplygeek\vro-js‘ is derived from the groupId and artifactId values.
/**
 * Write a brief description of the purpose of the action.
 * @param {number} x - describe each parameter as in JSDoc format.
 * @param {number} y - you can use different vRO types.
 * @returns {number} - describe the return type as well
 */
(function (x, y) {
    return x + y;
});
I recommend removing this folder later once you have created new functions, but it can be useful for initial testing (pushing/pulling code).
To create new functions (Actions), create a folder structure which is based on the module path in Orchestrator. As per my example, if there was an Action in Orchestrator called ‘myFunction‘ in the module ‘com.simplygeek‘, this would be represented as a folder structure ‘com/simplygeek‘ which contains a file called ‘myFunction.js‘. Use the sample function for the initial boilerplate for these functions.
It is important to note lines 1-6, which are the JSDoc block used to describe the function. Build Tools uses this information when creating the Action in Orchestrator and for defining the inputs and return type (the parameters within the function() are ignored during this process).
vRO XML-based Project
This project will allow content in Orchestrator to be managed in its native XML format for the development of Workflows, Configurations and Resources (Actions are also supported but will be wrapped in XML and are therefore not recommended (use JavaScript-based projects for this!)).
Create a vRO XML-based Project Example
mvn archetype:generate -DinteractiveMode=false -DarchetypeGroupId=com.vmware.pscoe.o11n.archetypes -DarchetypeArtifactId=package-xml-archetype -DarchetypeVersion=4.7.0 -DgroupId=com.simplygeek -DartifactId=vro-xml -DworkflowsPath=Simplygeek
Set ‘groupId‘ and ‘artifactId‘ to your values. Set ‘workflowsPath‘ to the name (or path) of the root folder for the Orchestrator Workflows (do not use Library as this already exists). This can also be changed later by simply renaming the folder that is created or creating a new folder (or multiple folders if desired).
Once complete, you should see a new folder with the name of what artifactId was set to (vro-xml in my example). Within this folder, there will be a sample Workflow in the path ‘src\main\resources\Workflow\Simplygeek‘ where ‘Simplygeek‘ is derived from the workflowsPath value.
vRO Mixed Project
The Mixed project is a ‘virtual‘ Maven project that contains two underlying projects, a JavaScript-based and an XML-based project. A virtual Maven project allows these to be managed as a single entity using a single set of Maven commands/goals to push/pull content to/from Orchestrator.
As per the Build Tools documentation, this project is recommended for the initial onboarding of existing Orchestrator code into the solution. Later, the code should be moved and managed within their respective project types.
Create a vRO Mixed Project Example
mvn archetype:generate -DinteractiveMode=false -DarchetypeGroupId=com.vmware.pscoe.o11n.archetypes -DarchetypeArtifactId=package-mixed-archetype -DarchetypeVersion=4.7.0 -DgroupId=com.simplygeek -DartifactId=vro-mixed -DworkflowsPath=Simplygeek
Set ‘groupId‘ and ‘artifactId‘ to your values. Set ‘workflowsPath‘ to the name (or path) of the root folder for the Orchestrator Workflows (do not use Library as this already exists). This can also be changed later by simply renaming the folder that is created or creating a new folder (or multiple folders if desired).
Once complete, you should see a new folder with the name of what artifactId was set to (vro-mixed in my example). Within this folder, there will be two subfolders, ‘actions‘ and ‘workflows‘. These are Maven projects based on the ‘package-actions-archetype‘ and ‘package-xml-archetype‘ archetypes, respectively.
These subprojects follow the same folder structure as per the examples above for the respective project type.
vRA 8.x Project
The VCF Automation 8.x project type allows the management of all VCF Automation content that includes:
- Cloud Templates (blueprints);
- Custom Forms
- Subscriptions
- Catalog Items
- Content Sources
- Property Groups
- Policies
- Catalog Entitlements
- Resource Actions
- Image / Flavor Mappings
- Storage Profiles
Create a vRA 8.x Project Example
mvn archetype:generate -DinteractiveMode=false -DarchetypeGroupId=com.vmware.pscoe.vra-ng.archetypes -DarchetypeArtifactId=package-vra-ng-archetype -DarchetypeVersion=4.7.0 -DgroupId=com.simplygeek -DartifactId=vra-content
Set ‘groupId‘ and ‘artifactId‘ to your values.
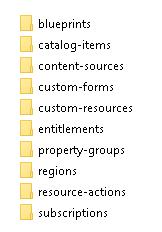
Once complete, you should see a new folder named by the artifactId (vra-content in my example). Within this folder, there will be the following folder structure under ‘src\main\resources‘:
At the root of the project, there will be a ‘content.yaml‘ file with the following content:
blueprint:
  - Volume
subscription: []
flavor-mapping:
  - small
  - medium
image-mapping: []
storage-profile: []
region-mapping:
  cloud-account-tags:
    export-tag: "env:dev"
    import-tags: ["env:dev", "env:test"]
catalog-item: []
custom-resource: []
resource-action: []
catalog-entitlement: []

property-group: []
policy:
  content-sharing: []

content-source: []
These lists represent the content items that will be pushed or pulled from the VCF Automation platform, regardless of which content exists within the project. The best approach when starting is to populate content in VCF Automation and then update this file with the items. Then pull down the content, which can be managed within the project.
Hopefully, this is enough to get started with the various project types available, and I will provide further content to cover these in more depth soon.