
Please note that this post was created before VMware released the vRealize Build Tools fling. I have a new series which covers using these tools and in effect, supersedes this post. Please check out my new series on IaC for vRealize: Deploying vRealize Build Tools To Allow Infrastructure As Code for vRA and vRO
When you are developing in a vRealize Orchestrator environment, one of the biggest frustrations is being limited to the vRO IDE. The vRO IDE is very simple, in that it does not provide any of the features that you would expect from an IDE, such as IntelliSense and quality of life extensions/addons, and only provides basic syntax checking.
There is no integration with source control management systems such as GIT (it has an internal system which isn’t great), moving code can be difficult and unit testing in the true sense of development, doesn’t exist. A connection to the vRO IDE uses a JAVA client and also requires a constant connection to the vRO server, so developing on the move or offline isn’t possible.
Anyone that has developed on this platform will have experienced the same issues and can only dream of the day when this is no longer the case.
You can use an IDE called Visual Studio Code, that can help make your development life easier. Admittedly, this alone doesn’t solve all of the discussed problems, but it does allow you to leverage the power of this IDE to assist in code development. There are still restrictions, such as lack of integration with vRO itself, which requires the code to be manually copied to the vRO server (yes, annoying). The good news, however, is that solutions are starting to become available to provide that integration. I am going to expand more on this at the end of this post.
If you haven’t heard of Visual Studio Code, it is a lightweight and features rich IDE created by Microsoft. The Visual Studio Code website describes it as:
Visual Studio Code combines the simplicity of a source code editor with powerful developer tooling, like IntelliSense code completion and debugging.
First and foremost, it is an editor that gets out of your way. The delightfully frictionless edit-build-debug cycle means less time fiddling with your environment, and more time executing on your ideas.
Visual Studio Code supports macOS, Linux, and Windows – so you can hit the ground running, no matter the platform.
I do almost all of my vRO development using Visual Studio Code, which gives me access to useful extensions and most importantly, keeps me in the mindset of how a developer should work.
In this post, I am going to cover how to set up a Visual Studio Code environment in Windows, install some useful extensions that I like to use and the installation of GIT and other required software components.
Page Contents
Setting Up Your Development Environment
The first thing that you will want to do, is download and install Visual Studio Code from here. When you launch this for the very first time, you’ll get an immediate good impression, from how quickly it loads and how lightweight it feels. The default dark theme is also quite nice.
Once Visual Studio Code is installed, create a projects folder somewhere on your file system (I have mine under C:\Users\<username>\projects). Then create an additional folder called ‘vRealize Orchestrator’. This will be the projects folder to store all of your vRO code.
Install Additional Components
We will need some additional components installed so that we can use the built-in SCM (GIT) support to store our code in a repository and also NPM (provided with NodeJS), needed to install some extension dependencies.
Install Git for Windows
GIT for Windows provides command-line tools that can be used to create and manage your GIT code repositories. Visual Studio Code provides built-in support for GIT but requires this component to be installed to utilise it.
You can download GIT for Windows here.
You can install GIT using most of the default settings but I’d recommend setting the following:
Set the default editor to Visual Studio Code.
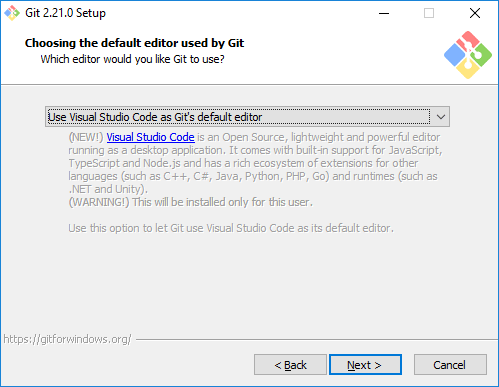
Use Windows’ default console window.
Confirm the installation by opening a Windows command console and issuing the following command:
git --version
The version will be displayed:
![]()
Install NodeJS for Windows
NodeJS for Windows provides the NPM package manager that is required by Visual Studio Code to install some of the extensions that aid us in developing JavaScript.
You can download NodeJS for Windows here. Install using the default settings is usually fine.
Confirm the installation by opening a Windows command console and check NPM works by issuing the following command:
npm --version
The version will be displayed:
![]()
Install and Configure Visual Studio Code Extensions
Visual Studio Code provides a ton of out of the box features that are immediately useful, such as syntax checking, IntelliSense, etc. but the IDE can be further extended by installing additional extensions. There are a plethora of extensions available that can be searched for and installed with ease, direct from the IDE itself. The extensions provide tons of added functionality and can help you catch coding errors, quickly, allowing for more rapid development and better quality software. I am going to detail some of the extensions that I use specifically for vRO development.
If you want to read more about the Extensions feature in Visual Studio Code, how to search, install and manage these, then visit the Visual Studio Code Extension Marketplace website.
Note, that this is not a full list of VScode extensions that I use, but those which I find are the most useful for vRO development.
ESLint
ESLint is a pluggable linting tool for JavaScript. Linting is a process/tool that analyses your code and checks for programming and stylistic errors that can often lead to bugs or code that is difficult to read. ESLint can be configured through a set of defined rules that can describe how your code should look.
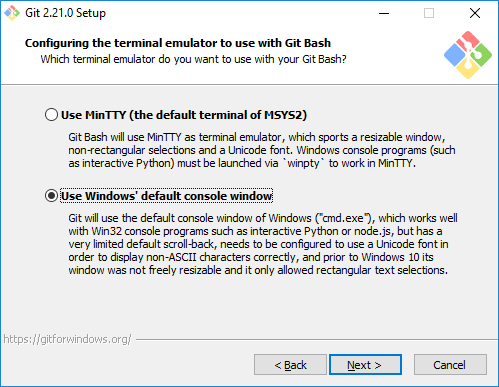
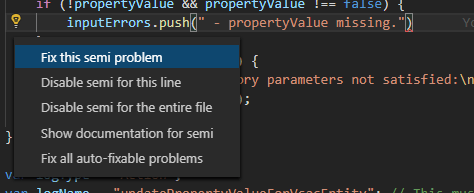
If the source code does not conform to any of the configured rules, then the lines are highlighted with a red underline and an error displayed in the ‘Problems’ output. Below is an example of some errors that have been detected in the source code by ESLint rules:
VScode provides a built-in ‘fix it’ feature that can be used to correct any code errors if it is supported by the extension. ESLint provides this support, therefore, the fix’ feature can easily be used to correct any code faults that are found.
It is also possible to turn on automatic code correction (although I never use this), which can remove the requirement to do this manually, which is quicker. However, you need to make sure that you are confident that your rules are working well to prevent code being incorrectly modified.
Install ESLint
To install the ESLint extension, you first need to install the module using npm. Open an administrator command prompt and issue the following command to install ESLint globally on the system:
npm install -g eslint

Now that the module has been installed on the system, you will need to install the ESLint VScode extension. Click the Extensions button ![]() (CTRL-SHIFT-X) and search for and install ESLint.
(CTRL-SHIFT-X) and search for and install ESLint.
Configure ESLint
By default, ESLint will look for a .eslintrc configuration file in the project folder. You can create an initial configuration file using the following command (make sure you are in the root of the vRealize-Orchestrator project folder):
eslint --init
The ESLint documentation provides some really good examples of how to create the initial configuration and installation help.
The configuration is essentially made up of rules that tell ESLint how your code should look. Examples include identifying tabs where only spaces should be used, too many blank lines, lines that are too long, etc. There are easily around a hundred available rules. You can read more about the available rules at the eslint docs site https://eslint.org/docs/rules.
You can also download and use my eslint configuration file to get you going. Just download the file and place it in the root of your vRealize-Orchestrator project folder. You can get the file from my Git repository here. I am updating this file all the time and will look to dedicate a blog post for it one day in the future.
Preview JSDOC
JSDoc is a documentation generator for JavaScript that allows developers to describe functions, classes, modules and even variables directly in the source code. When JSDoc annotations exist within the source code, it is possible to dynamically generate HTML documents, automatically. using the JSDoc tool. This can be useful if you have a requirement to maintain documentation for your code. The Preview JSDOC extension automatically generates these JSDoc HTML files on the fly, every time a JavaScript file is saved within a project. JSDoc support is built into VScode.
JSDoc can also be used to describe what data types a variable is expected to be. This feature provides the ability to add JSDoc ‘type’ annotations that can be used to provide static type enforcement. Once variable types have been described, you can turn on this feature natively within VScode, and type checks will be performed. I do not use this feature with vRO code as VScode is unable to understand what data types would be returned from an action call (as these are not standard JavaScript and specific to vRO).
Here is an example of a JSDoc annotation that I insert into every action I create:
/**
 * Searches the vRO inventory for a vCACHost with the specified id.
 * @author Gavin Stephens <gavin.stephens@simplygeek.co.uk>
 * @version 1.0.0
 * @function findVcacHostById
 * @param {string} hostId - The vCAC Host id.
 * @returns {vCAC:vCACHost} returns the vCAC host object.
 */
This does not completely conform to the JSDoc standard way of documenting your JavaScript code. The reason for this is that vRO Actions, although are simply functions within the Rhino engine, are not entirely presented that way through vRO. Instead, the function declaration statement is missing. Regardless, I like to insert this JSDoc block at the top of my vRO Action, as it provides a good description of the variable names and types and any return values. I also include the @function attribute to tell JSDoc what this function is called.
As I stated previously, the Preview JSDOC extension generates HTML documents on the fly, each time JavaScript files are created or saved within a project. Below is an example of how this looks for the same JSDoc annotation that I provided earlier:
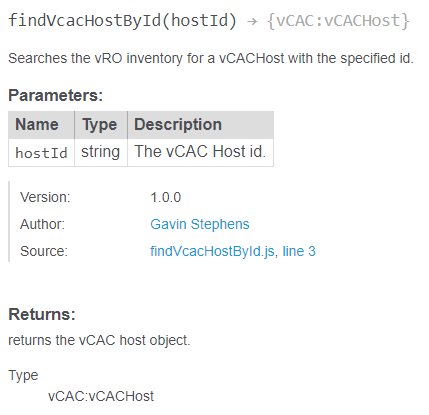
For more information on the JSDoc attributes available and guidelines on how to document your code, visit the JSDoc website: https://jsdoc.app/.
Install Preview JSDOC
To install the Preview JSDOC extension, you first need to install the jsdoc module using npm. Open an administrator command prompt and issue the following command to install jsdoc globally on the system:
npm install -g jsdoc

Now that the jsdoc module has been installed on the system, you will need to install the Preview JSDOC VScode extension. Click the Extensions button ![]() (CTRL-SHIFT-X) and search for and install Preview JSDOC.
(CTRL-SHIFT-X) and search for and install Preview JSDOC.
GitLens
GitLens provides many advanced features that extend the built-in support for Git within VScode. The built-in support only provides basic functionality, such as pulling/pushing, staging, stashing and committing code with comments. GitLens provides a ton of additional features, too many to note on this post but I will cover those that I find the most useful.
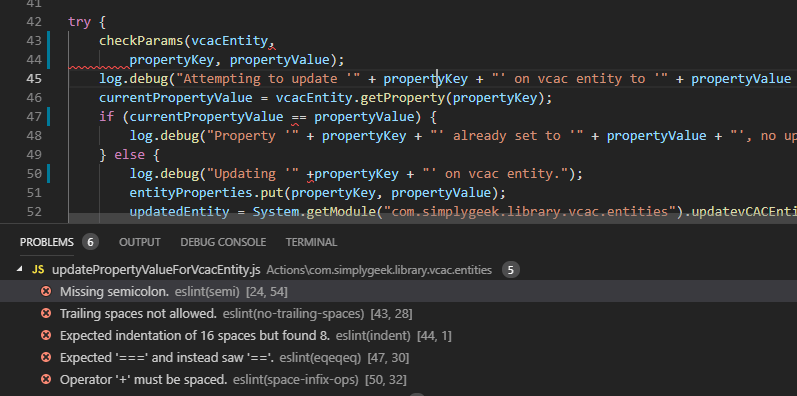
View When a change was made, line by line, showing how long ago the change was made, by who, and the associated commit comment.
![]()
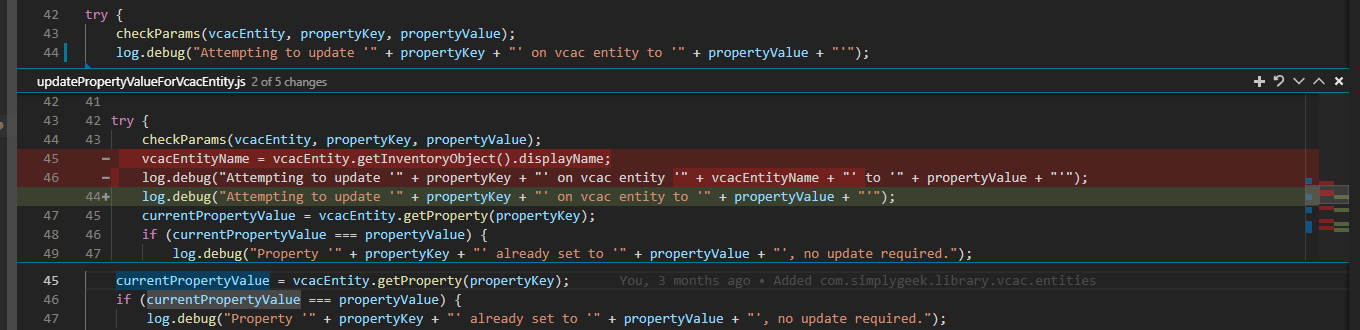
Compare the difference between a section of code to the last change, directly in the source code. Here you can see that some code was modified, displaying the lines that were removed/changed or any new lines that were added. This is useful to quickly get a glance at any recent changes that were made without having to browse the Git commit-tree.
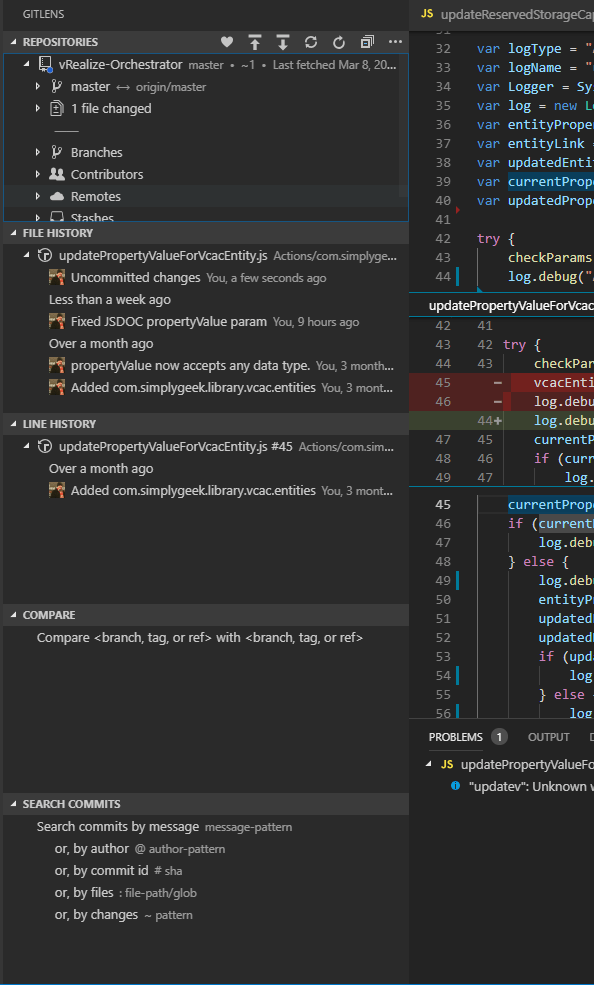
View the Git repositories directly on the activity bar via the GitLens button. Here, you can do many of the actions that you would do using the Git CLI, such as creating new branches, switching between multiple branches or changing the active branch. You can also get the history of changes that have been made on a per-file or per-line basis.
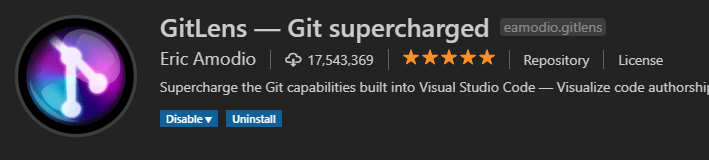
Install GitLens
There are no modules needed to install this extension. Just click the Extensions button ![]() (CTRL-SHIFT-X) and search for and install GitLens.
(CTRL-SHIFT-X) and search for and install GitLens.
Looking Forward – Future vRO Integration
I find using Visual Studio Code extremely valuable when it comes to developing on the vRealize Orchestrator platform. However, as I previously stated, there is no direct integration between the vRO server and VScode. Therefore, I have to manually copy the code back to vRO and vice versa. This can sometimes be a little challenging and requires an enormous amount of discipline (which I still think is worth it).
This does look to be changing. Late in 2018, the VMware COE team published this blog https://blogs.vmware.com/management/2018/11/automating-at-scale-with-vro-and-vra.html, which demonstrates an internal plugin that they have created for visual studio code and provides integration with and exposure of the core scripting API and plugin objects in vRO.
Unfortunately, this has not been made available to the wider community and is only available when working with COE and at a cost. This is quite a shame as they are shutting out an entire community of developers that are hungry for this and could do some amazing things. Maybe one day…
As of May, VMware has released its internal plugin for visual studio code as a fling: https://labs.vmware.com/flings/vrealize-build-tools
But there is another glimmer of hope. ITQ has been working on and have recently released a new project called vROAST (vRealize Orchestrator Assistant). This is a virtual appliance that is configured with the target vRO server and a git repository. Once configured, it will automatically export and transpile all vRO code (currently only supports Actions) to TypeScript and store in the git repository. It is then possible to check out this git repository in Visual Studio Code and work on the codebase just like any TypeScript project.
Using vROAST, it should be possible to utilise all the advanced features of the VScode IDE, manage code offline, collaborate effectively with development teams and perform unit testing. I am excited to do some interesting things with this and will provide some posts on my experiences.
Once again, I hope that you have found this post useful. I welcome any additional suggestions for making life as a vRO developer easier. I would also be interested in hearing about other developers experiences when developing on the vRO platform.
Awesome post Gav !
[…] you, managing code outside of the appliance is difficult. In fact, I recently wrote a post about Using Visual Studio Code for your vRealize Orchestrator Development, where I highlighted some of the challenges with this. The issue is that we’re not really […]
Hi,
Thank you for the great post.
Looks like their internal vRO plugin developed by COE, is now publicly available.
https://labs.vmware.com/flings/vrealize-build-tools
Hey. Thanks for the comment and yeah I am aware. In fact, I have some blog posts on them if you haven’t checked them out: https://www.simplygeek.co.uk/2019/06/12/deploying-vrealize-build-tools-to-allow-infrastructure-as-code-for-vra-and-vro
[…] Using Visual Studio Code for your vRealize Orchestrator Development […]
Hello Gavin, wrt. using node.js with vRO development I had some difficulties. vRO uses ES5 while node.js is ES6 so not all “modern” code running fine on node.js can be run on vRO. I had better results with vco-cli where my code actually runs on the vRO JS interpreter and I can also access “live data”. Especially when I’m exploring new areas of vRO/vRA and trying to figure out possible ways of implementing tasks. I’m not sure how vscode could help doing that. Have you tried the unit tests shown at the video of vrealize-build-tools? Are these not limited to… Read more »
Hi Ixan. The purpose of this post was to cover the use of VScode and some plugins that are useful. The main reason NodeJS was used was mainly to provide NPM and allow eslint checks to be performed. My latest series on using the vRealize Build Tools, which includes better use cases and I have some posts in the works for unit testing. I’ll make a note on this post that my new series supersedes this.
Thanks Gavin, I saw your new posts before commenting here. The main reason I chose to post my questions here is: my concerns are more related to using Node.js to develop and test vRO code than to the build tools shared by VMware recently. This is covered in part 4, I’ll add a new note there if you don’t mind…