- Build Tools for VMware Aria – Getting Up and Running
- Build Tools for VMware Aria – Overview of Aria Automation Projects
It has been a while since I have covered anything related to the build tools that support development in Aria Automation Orchestrator and a lot has changed since I covered it in my ‘IaC for vRealize‘ series of posts. Many people have been asking and I finally had some time to write an updated post, covering the latest versions of the build tools (currently version 2.36.0 as of writing). This guide is recommended for Build Tools from version 2.30.x and any earlier versions may not work correctly.
A lot has changed, most notably the rebranding from vRealize Build Tools to Build Tools for VMware Aria. This project is no longer a fling (we’ll miss you Flings) but is managed as an open-source project on GitHub. There is also support for other products in the Aria suite as content can now be managed for the following products:
- VMware Aria Automation
- VMware Aria Automation Orchestrator
- VMware Aria Automation Pipelines
- VMware Aria Operations
- VMware Aria Operations for Logs
- VMware Cloud Director
Build Tools for VMware Aria is also now available in the public Maven repositories, which means we no longer need to upload artifacts (with one exception, the Keystore, but more on that later) to an internal repository or have access to a vRO 7.3 appliance. You can now just create a project and immediately begin using the build tools if you have direct access to the Internet (although for enterprise it’s best to set up a supporting platform!).
I will not be covering the following in this post:
- Any form of Git integration
- CI pipelines
- Multiple environments or multi-tenants
- Visual Studio Code integration
- Project structure / multiple or nested projects (apart from just the default ones created using the examples)
I feel these topics are best covered in dedicated posts and are not required to be up and running with the Build Tools.
Page Contents
Deploy and Configure Artifactory Repository Manager (optional)
It is highly recommended to deploy or have access to an Artifact Repository manager for storing supporting artifacts and for use with deployment targets and pipelines. There are many options available here such as the product of choice (Artifactory, Nexus, Gitlab, and so on) and enterprises may already have these in place concerning projects, repositories, and permissions structures. What I provide here is a basic setup for guidance purposes only.
Due to the many different products that exist and the options available, I would not do it service to document the process here. Instead, I decided to set up Jfrog Artifactory using this guide to deploy using containers managed by Podman running on Rocky Linux 9. You can follow the same guide or decide yourself how you want to deploy this.
Configure Jfrog Artifactory
If you are installing Artifactory, It is assumed at this point that you have it set up, with the default password changed and logged into the UI. This section will go through the steps to configure Artifactory for use with the build tools.
Create a Local Repository for Aria
The first thing to do is create a new repository that we can use to store the keystore file. Previous versions of the build tools used a Java Keystore but this has been changed to a Maven package/artifact that contains a certificate and key file. This is a lot easier to work with and simpler to distribute.
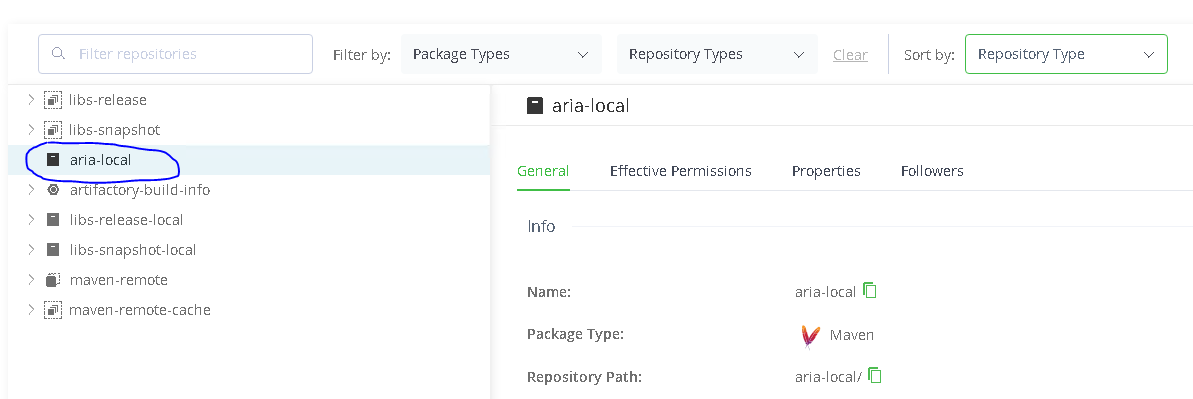
Select Administration -> Repositories and select the Local tab. Click the ‘Add Repository‘ button (located at the top right for the version I am using) and select ‘Local Repository‘. Choose Maven as the package type. Enter a Repository Key (I used aria-local) and click ‘Create Local Repository‘.
The new local repository will be visible in the list.

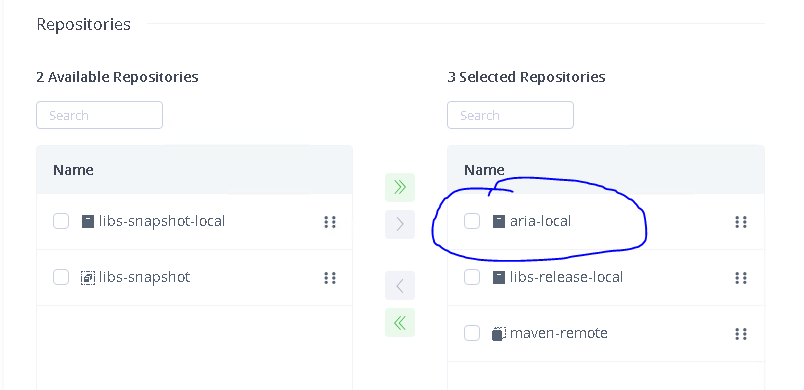
The next step is to add this repository to the libs-release virtual repository. Select the Virtual tab and click on the repository name libs-release. On the Basic Configuration page, scroll to the bottom until you see Repositories. Drag or select and use the arrow button to move the repository across to the right (Selected).
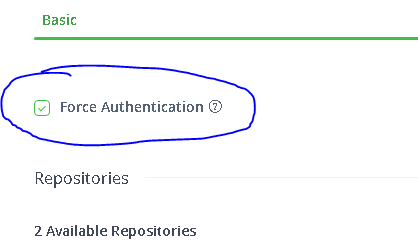
While on this screen, click the checkbox for ‘Force Authentication‘ located just above Repositories. This will force the requirement for an authenticated user to access the repository (anonymous access disabled).
Click Save.
Repeat the steps above to enable ‘Force Authentication‘ on the libs-snapshot virtual repository.
Create a User for Repository Access
This section will detail the steps to create a local Artifactory user account that can be used to authenticate to the repository. You could also opt to use an LDAP/Active Directory account if you configure this integration.
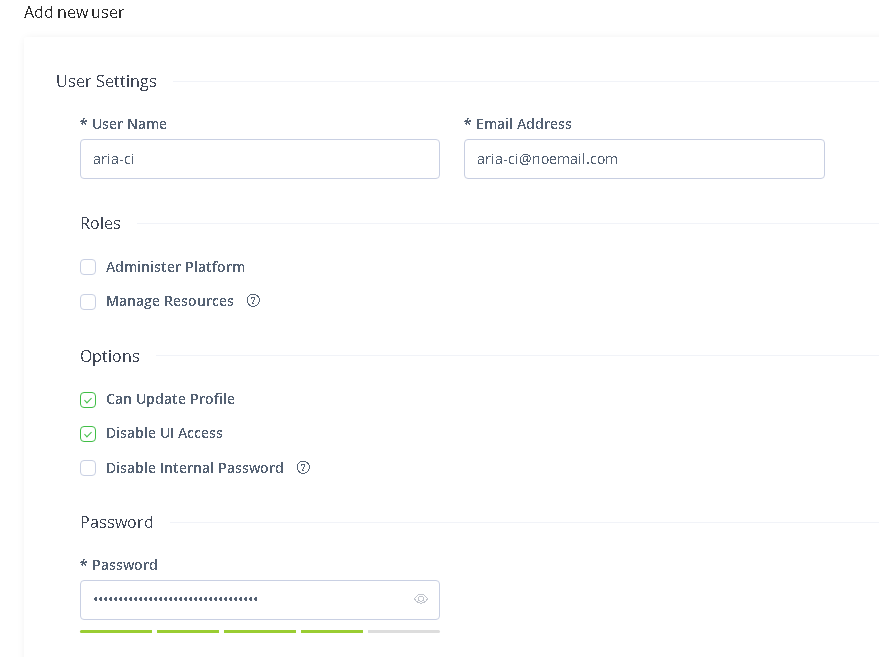
Select Administration -> User Management and select Users. Click the ‘New User‘ button (located at the top right for the version I am using). Give this user a name that you find suitable (I called this user aria-ci) and set the password. You can optionally check ‘Disable UI Access‘ but you may want to leave this unchecked for testing.
Click Save
Next, select Permissions and click the ‘New Permission‘ button. Provide a suitable name for this permission (I called this aria-ci). Under Resources, click ‘Add Repositories‘ and check the 3 checkboxes a the top, ‘Any Local Repository‘, ‘Any Remote Repository‘, and ‘Any Distribution Repository‘.
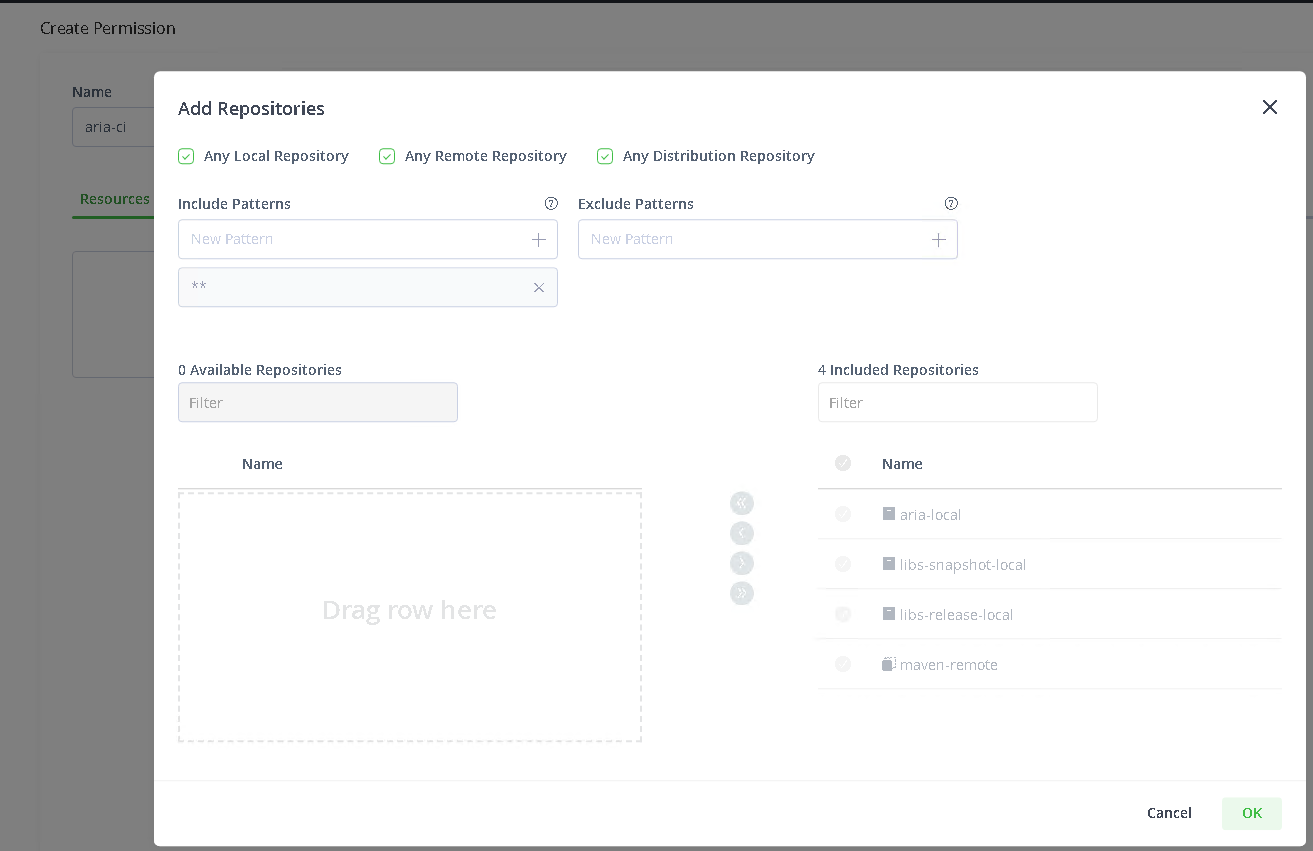
Click OK.
Under Users, click the + icon next to Selected Users. Drag or select and use the arrow to move the user account to this permission.
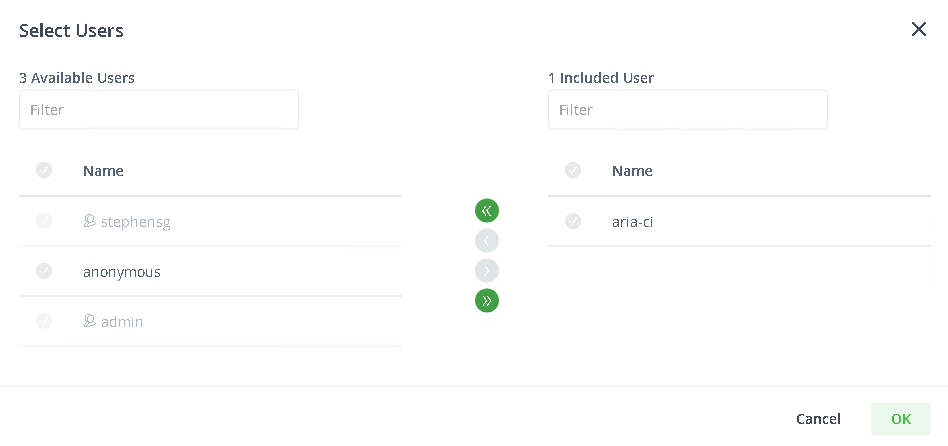
Click OK and finally click Create.
Create Certificate for Orchestrator Package Signing
A certificate is required to sign packages that are created for Orchestrator (import/export). In the earlier versions of the Build Tools, the requirement was to create a Java Keystore file, which contained all the certificates. This wasn’t easy to manage and was difficult to distribute across teams. This has now been replaced with a Maven artifact that contains the certificate and private key and can be distributed using an artifact repository manager.
OpenSSL is required to generate the certificates. I am using a 3.0.x (LTS) Light release for Windows, which I downloaded from here.
I like to create a configuration file for certificate information, which I keep in Git. Create a configuration file ‘keystore.cfg‘ with the following:
[ req ]
default_bits = 2048
default_keyfile = private_key.pem
distinguished_name = req_distinguished_name
encrypt_key = no
prompt = no
string_mask = nombstr
req_extensions = v3_req

[ v3_req ]
basicConstraints = CA:FALSE
keyUsage = digitalSignature, keyEncipherment, dataEncipherment, nonRepudiation
extendedKeyUsage = serverAuth, clientAuth
subjectAltName = @alternate_names

[ req_distinguished_name ]
countryName = ##Country##
stateOrProvinceName = ##State##
localityName = ##Locality##
0.organizationName = ##OrgName
organizationalUnitName = ##OrgUnitName##
commonName = ##domain.local##

[ alternate_names ]
DNS.1 = ##domain.local##
Replace all values with ##xyz## with your own.
From the command shell run the following OpenSSL commands to create the certificate to your requirements (signed or unsigned).
Signed Certificate
# Create Private Key with password.
openssl genrsa -passout pass:VMware1! -out key.pem 2048

# Create Certificate Signing Request.
openssl req -new -outform PEM -out cert.csr -inform PEM -key key.pem -config keystore.cfg

# Sign Certificate with CA (I am using Active Directory CA with a Certificate Template called 'VMwarevSphere'.
certreq -attrib "CertificateTemplate:VMwarevSphere" -submit cert.csr
<Save as cert.crt>

# Convert Certificate and Private Key to PKCS #12 format.
openssl pkcs12 -export -name "_dunesrsaalias_" -out cert.pfx -inkey key.pem -in cert.crt
openssl pkcs12 -in cert.pfx -nocerts -out private_key.pem
openssl pkcs12 -in cert.pfx -nokeys -clcerts -out cert.pem
Self-Signed Certificate
# Create Private Key with password.
openssl genrsa -passout pass:VMware1! -out private_key.key 2048

# Create Self-Signed Certificate.
openssl req -new --x509 -sha256 -days 3650 -key private_key.key -out cert.crt -config keystore.cfg

# Convert Certificate and Private Key to PKCS #12 format.
openssl pkcs12 -export -name "_dunesrsaalias_" -out cert.pfx -inkey private_key.key -in cert.crt
openssl pkcs12 -in cert.pfx -nocerts -out private_key.pem
openssl pkcs12 -in cert.pfx -nokeys -clcerts -out cert.pem
Create Keystore Artifact (optional)
This section is only required if you plan to use an artifact repository manager.
Create a folder called ‘archetype.keystore-1.0.0‘. Move the following files into this folder:
- private_key.pem
- cert.pem
Compress this folder using ZIP format and create a file called ‘archetype.keystore-1.0.0.zip‘ (the zip file should include the folder called archetype.keystore-1.0.0).
Upload Keystore Artifact to Artifactory
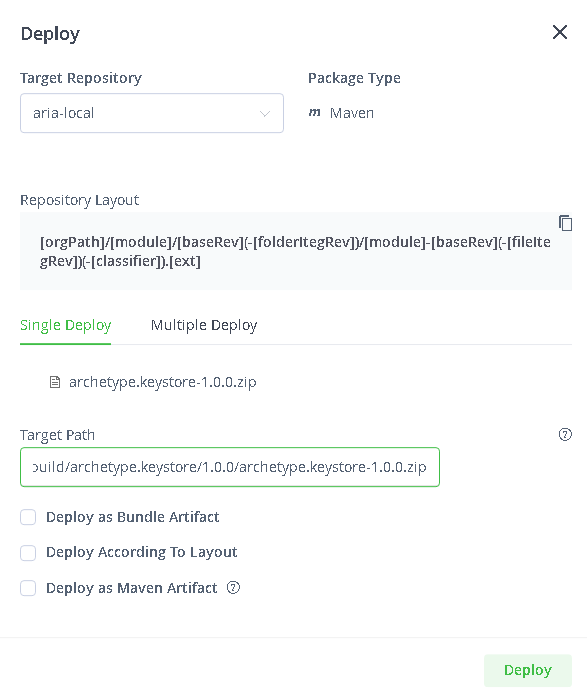
Log into the Artifactory UI, select Application-> Artifactory, and select Artifacts. In the repositories list on the left, select the ‘aria-local‘ (or the local repository you created earlier, if different) repository.
Click the ‘Deploy‘ button (located at the top right for the version I am using). Make sure that ‘Single Deploy‘ is selected and add the ‘archetype.keystore-1.0.0.zip‘ file. Set the Target Path to ‘com/vmware/pscoe/build/archetype.keystore/1.0.0/archetype.keystore-1.0.0.zip’ and then click Deploy.
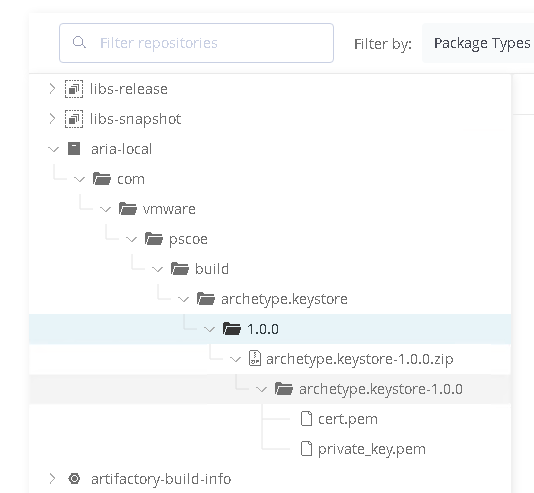
If the upload is successful, you will see the repository now includes a path to the file and its contents.
Configure Developer Workstation (Windows)
The developer workstation will need some prerequisite software installed and Maven configured to start using the Build Tools. This guide focuses specifically on Windows.
Install Postman (optional)
Postman is a great tool for testing API calls on the Windows desktop and has a nice graphical interface for managing environments, variables, and API collections. This is optional, but I will provide some steps on how to use Postman to obtain the Aria Automation API Refresh Token, which is needed for the build tools to access the infrastructure. Download it here.
Obtain Aria Automation Refresh Token
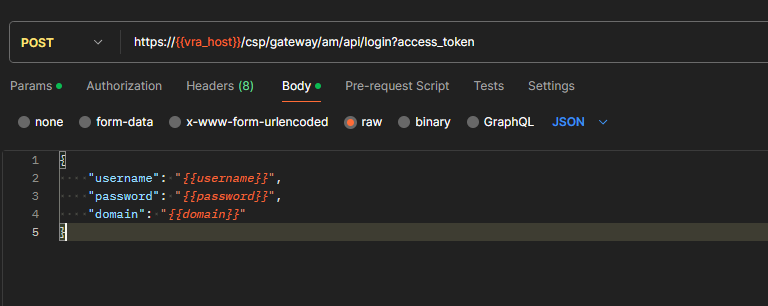
An API refresh token is required to obtain an access (bearer) token when making API calls to Aria Automation. For the Build Tools, only the refresh token is required (as the build tools will internally request bearer tokens when needed). To request the refresh, make a POST request to ‘https://{{vra_host}}/csp/gateway/am/api/login?access_token’, where {{vra_host}} is the hostname of your Aria Automation environment.
The POST request must include a JSON body as follows:
{
    "username": "{{username}}",
    "password": "{{password}}",
    "domain": "{{domain}}"
}
Substituting {{username}}, {{password}} and {{domain}} with your own values. If you are using a local account then set the domain to ‘System Domain’, otherwise use the domain name of the directory that has been integrated (i.e. Active Directory domain).
Here is an example of this set up in POSTMAN (I am using a POSTMAN environment with these variables set):
When pressing Send, a refresh token is received:
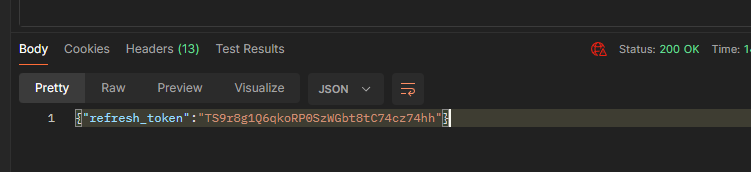
Make note of the refresh token, as this will be needed later.
Note that the refresh token is only valid for 90 days and will need to be renewed to continue using the Build Tools.
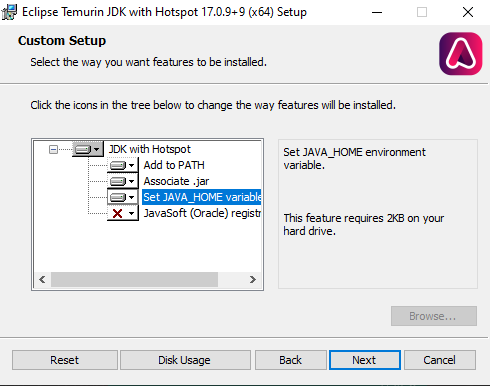
Install Java Development Kit (JDK)
Java JDK is required to use Maven and the Build Tools officially supports JDK version 17 (LTS release). I use the Adoptium build of JDK, which can be downloaded here: https://adoptium.net/en-GB/temurin/archive/?version=17. Please make sure you download the JDK (not JRE). I also recommend the ‘Installer‘ which can set the Path and JAVA_HOME variables for you.
Run the installer and change the option to set the JAVA_HOME variable.
Install NodeJS
NodeJS is required for the Build Tools to download any dependencies via NPM. The Build Tools supports version 16.x, which can be downloaded from the NodeJS website here. You most likely want the ‘win-x64.zip‘ package.
The binary package does not include an installer so extract to a directory, that does not include any spaces. (I have mine located in ‘%USERPROFILE%\AppData\Local\node-v16.20.2-win-x64’).
Add the NodeJS directory to the environment path. I had previously provided examples of using the ‘setx‘ command but have since found this can be quite unreliable. Instead, do this manually by adding the path to the PATH environment variable under ‘Edit environment variables for your account‘ in the start menu.

Open a command prompt and type node –version to verify that NodeJS is working. You should see output similar to the below:
node --version
v16.20.2

npm --version
8.19.4
Install Apache Maven
Apache Maven is used for managing and building projects, based on the Project Object Model (POM). Download the Maven binary package from https://maven.apache.org/download.cgi. Build Tools recommends version 3.8.7 but I have used 3.9.x without issue.
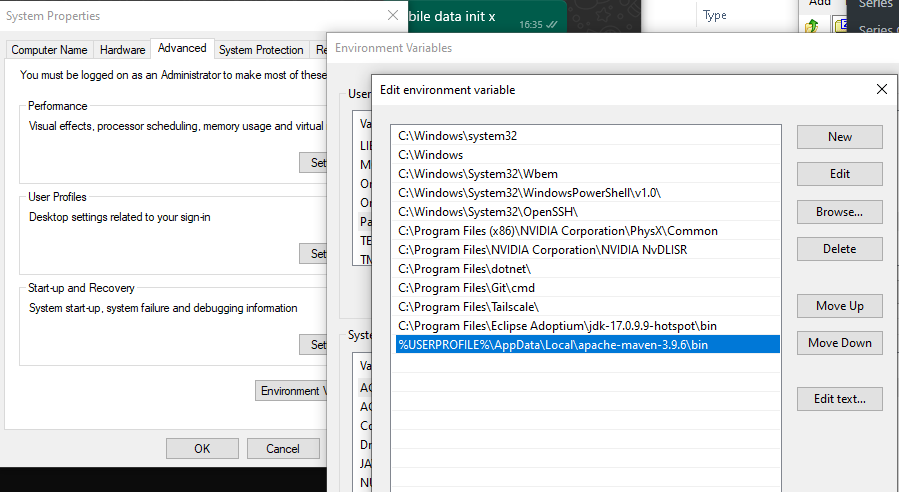
The binary package does not include an installer so extract to a directory, that does not include any spaces. (I have mine located in ‘%USERPROFILE%\AppData\Local\apache-maven-3.9.6’).
Add the Maven bin directory to the environment path. I had previously provided examples of using the ‘setx‘ command but have since found this can be quite unreliable. Instead, do this manually by adding the path to the PATH environment variable under ‘Edit environment variables for your account‘ in the start menu.
Open a command prompt and type mvn –version to verify that Maven is working. You should see output similar to the below:
mvn --version
Apache Maven 3.9.6 (bc0240f3c744dd6b6ec2920b3cd08dcc295161ae)
Maven home: C:\Users\gavin\AppData\Local\apache-maven-3.9.6
Java version: 17.0.9, vendor: Eclipse Adoptium, runtime: C:\Program Files\Eclipse Adoptium\jdk-17.0.9.9-hotspot
Default locale: en_GB, platform encoding: Cp1252
OS name: "windows 10", version: "10.0", arch: "amd64", family: "windows"
If this doesn’t work, go back and check the paths of where Maven and JDK have been installed and that these have been correctly set in the environment variables.
Create a Master Password
Maven allows encrypted server passwords to be stored in the settings.xml file. Before Maven can do this, it requires that a master password first be set. This is achieved using the ‘mvn –encrypt-master-password‘ command, which will prompt you to enter the master password that will be encrypted:
mvn --encrypt-master-password

You will need to store this encrypted string in the settings-security.xml located in the ‘%USERPROFILE%\.m2\‘ folder. If this does not already exist, then create it with the following content:
<settingsSecurity>
<master>{sMFA/2y5+qAHjPPmlxkFj1tcWbU6CGKwm3t1dA1eGSo=}</master>
</settingsSecurity>
Configure Project Settings (settings.xml)
The following sections provide example Settings.xml files that allow the Build Tools to be used with or without an artifact repository manager. I felt it would be useful for those who simply want to test-drive the Build Tools without having to invest in deploying a dedicated platform.
The Settings.xml file should be created in the ‘%USERPROFILE%\.m2\‘ folder.
Settings.xml (using Artifactory Repository)
Use the following Settings.xml example to use Build Tools with Artifactory Repository Manager. All artifacts are retrieved from this repository. If you followed my setup, then requests to Maven Central will be proxied through Artifactory and the keystore file will be downloaded from the aria-local repository.
Replace all values with {{ }} with your own.
<?xml version="1.0" encoding="UTF-8"?>
<settings xmlns="http://maven.apache.org/SETTINGS/1.0.0"
          xmlns:xsi="http://www.w3.org/2001/XMLSchema-instance"
          xsi:schemaLocation="http://maven.apache.org/SETTINGS/1.0.0 http://maven.apache.org/xsd/settings-1.0.0.xsd">
    <servers>
        <server>
            <id>aria-release</id>
            <username>aria-ci</username>
            <password>{{encrypted_password}}</password>
        </server>
        <server>
            <id>aria-snapshots</id>
            <username>aria-ci</username>
            <password>{{encrypted_password}}</password>
        </server>
    </servers>

    <profiles>
        <profile>
            <id>artifactory</id>
            <repositories>
                <repository>
                    <snapshots><enabled>false</enabled></snapshots>
                    <id>aria-release</id>
                    <name>aria-release</name>
                    <url>http://{{artifactory_fqdn}}:8082/artifactory/libs-release</url>
                </repository>
                <repository>
                    <snapshots><enabled>true</enabled></snapshots>
                    <id>aria-snapshots</id>
                    <name>aria-snapshots</name>
                    <url>http://{{artifactory_fqdn}}:8082/artifactory/libs-snapshot</url>
                </repository>
            </repositories>
            <pluginRepositories>
                <pluginRepository>
                    <snapshots><enabled>false</enabled></snapshots>
                    <id>aria-release</id>
                    <name>aria-release</name>
                    <url>http://{{artifactory_fqdn}}:8082/artifactory/libs-release</url>
                </pluginRepository>
                <pluginRepository>
                    <snapshots><enabled>true</enabled></snapshots>
                    <id>aria-snapshots</id>
                    <name>aria-snapshots</name>
                    <url>http://{{artifactory_fqdn}}:8082/artifactory/libs-snapshot</url>
                </pluginRepository>
            </pluginRepositories>
            <properties>
                <releaseRepositoryUrl>http://{{artifactory_fqdn}}:8082/artifactory/libs-release</releaseRepositoryUrl>
                <snapshotRepositoryUrl>http://{{artifactory_fqdn}}:8082/artifactory/libs-snapshot</snapshotRepositoryUrl>
            </properties>
        </profile>
        <profile>
            <id>packaging</id>
            <properties>
                <keystoreGroupId>com.vmware.pscoe.build</keystoreGroupId>
                <keystoreArtifactId>archetype.keystore</keystoreArtifactId>
                <keystoreVersion>1.0.0</keystoreVersion>
                <vroPrivateKeyPem>target/${keystoreArtifactId}-${keystoreVersion}/private_key.pem</vroPrivateKeyPem>
                <vroCertificatePem>target/${keystoreArtifactId}-${keystoreVersion}/cert.pem</vroCertificatePem>
                <vroKeyPass>VMware1!</vroKeyPass>
            </properties>
        </profile>
        <profile>
            <id>aria</id>
            <properties>
                <!-- Aria Automation Connection -->
                <vrang.host>{{vra_fqdn}}</vrang.host>
                <vrang.port>443</vrang.port>
                <vrang.org.name>{{vra_org_name}}</vrang.org.name>
                <vrang.project.name>{{vra_project_name}}</vrang.project.name>
                <vrang.refresh.token>{{vra_refresh_token}}</vrang.refresh.token>
                <vrang.vro.integration>{{vro_integration_name}}</vrang.vro.integration>
                <vrang.bp.release>true</vrang.bp.release>
                <!-- Aria Automation Orchestrator Connection -->
                <vro.host>{{vro_fqdn}}</vro.host>
                <vro.port>443</vro.port>
                <vro.auth>vra</vro.auth>
                <vro.authHost>{{vra_fqdn}}</vro.authHost> <!-- Required for external AAO instances when AA auth is used -->
                <vro.authPort>443</vro.authPort> <!-- Required for external AAO instances when AA auth is used -->
                <vro.refresh.token>{{vra_refresh_token}}</vro.refresh.token>
                <!--<vrealize.ssl.ignore.hostname>true</vrealize.ssl.ignore.hostname> -->
                <!--<vrealize.ssl.ignore.certificate>true</vrealize.ssl.ignore.certificate> -->
            </properties>
        </profile>
    </profiles>

    <mirrors>
        <mirror>
            <id>maven-default-http-blocker</id>
            <mirrorOf>external:dummy:*</mirrorOf>
            <name>Pseudo repository to mirror external repositories initially using HTTP.</name>
            <url>http://0.0.0.0/</url>
            <blocked>true</blocked>
        </mirror>
        <mirror>
            <id>aria-release</id>
            <name>Artifactory proxy for Maven Central</name>
            <url>http://{{artifactory_fqdn}}:8082/artifactory/libs-release</url>
            <mirrorOf>central</mirrorOf>
        </mirror>
    </mirrors>

    <activeProfiles>
        <activeProfile>artifactory</activeProfile>
        <activeProfile>packaging</activeProfile>
    </activeProfiles>
</settings>
The ‘{{encrypted_password}}‘ is the encrypted password, which you can generate using the ‘mvn –encrypt-password‘ command. This is the encrypted password for the user account that was created in the ‘Create a User for Repository Access‘ section).
Settings.xml (local / no repository required)
Use the following Settings.xml example to use Build Tools where no artifact repository is available. In this scenario, you are getting artifacts directly from Maven Central, and sourcing the keystore certificate and private key files locally.
Replace all values with {{ }} with your own.
<?xml version="1.0" encoding="UTF-8"?>
<settings xmlns="http://maven.apache.org/SETTINGS/1.0.0"
          xmlns:xsi="http://www.w3.org/2001/XMLSchema-instance"
          xsi:schemaLocation="http://maven.apache.org/SETTINGS/1.0.0 http://maven.apache.org/xsd/settings-1.0.0.xsd">
    <profiles>
        <profile>
            <id>packaging</id>
            <properties>
                <vroPrivateKeyPem>C:/path/to/keystore/private_key.pem</vroPrivateKeyPem>
                <vroCertificatePem>C:/path/to/keystore/cert.pem</vroCertificatePem>
                <vroKeyPass>VMware1!</vroKeyPass>
            </properties>
        </profile>
        <profile>
            <id>aria</id>
            <properties>
                <!-- Aria Automation Connection -->
                <vrang.host>{{vra_fqdn}}</vrang.host>
                <vrang.port>443</vrang.port>
                <vrang.org.name>{{vra_org_name}}</vrang.org.name>
                <vrang.project.name>{{vra_project_name}}</vrang.project.name>
                <vrang.refresh.token>{{vra_refresh_token}}</vrang.refresh.token>
                <vrang.vro.integration>{{vro_integration_name}}</vrang.vro.integration>
                <vrang.bp.release>true</vrang.bp.release>
                <!-- Aria Automation Orchestrator Connection -->
                <vro.host>{{vro_fqdn}}</vro.host>
                <vro.port>443</vro.port>
                <vro.auth>vra</vro.auth>
                <vro.authHost>{{vra_fqdn}}</vro.authHost> <!-- Required for external AAO instances when AA auth is used -->
                <vro.authPort>443</vro.authPort> <!-- Required for external AAO instances when AA auth is used -->
                <vro.refresh.token>{{vra_refresh_token}}</vro.refresh.token>
                <!--<vrealize.ssl.ignore.hostname>true</vrealize.ssl.ignore.hostname> -->
                <!--<vrealize.ssl.ignore.certificate>true</vrealize.ssl.ignore.certificate> -->
            </properties>
        </profile>
    </profiles>

    <activeProfiles>
        <activeProfile>packaging</activeProfile>
    </activeProfiles>
</settings>
Create Your First Project (Actions-based)
In this example, I will show you how to create a Javascript Actions-based project and how to push and pull code. If you wish to try out other project types, then use the official docs for guidance https://github.com/vmware/build-tools-for-vmware-aria/tree/v2.36.0/docs/archive/doc/markdown.
I recommend creating a single new root folder to store your projects. Open a command prompt and enter into this folder location. Run the following command:
mvn archetype:generate -DinteractiveMode=false -DarchetypeGroupId=com.vmware.pscoe.o11n.archetypes -DarchetypeArtifactId=package-actions-archetype -DarchetypeVersion=2.36.0 -DgroupId=com.simplygeek -DartifactId=js-actions
Replace ‘com.simplygeek‘ with your own value if you wish!
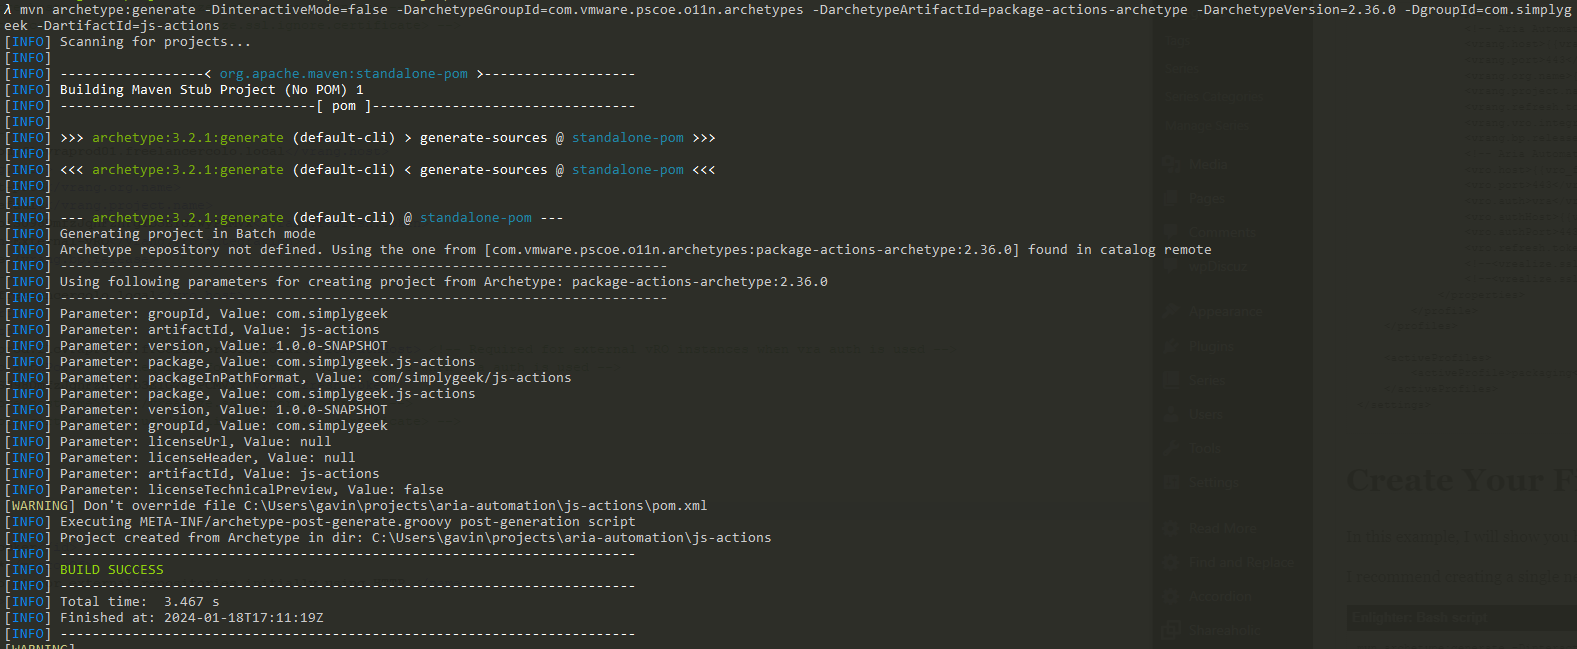
A new folder will now exist called ‘js-actions‘ and will include a sample.js function/action.
Push Actions
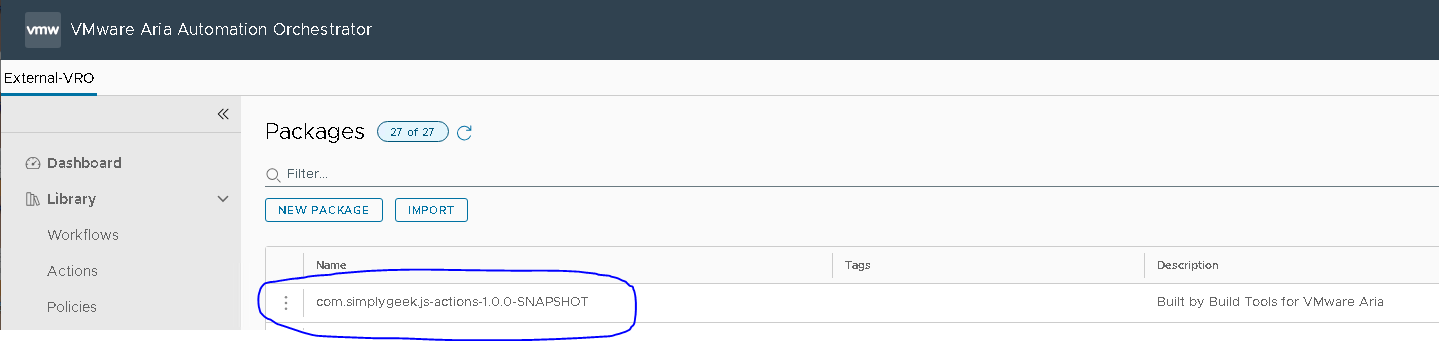
Push this new project to the Orchestrator server with the following command:
mvn clean package vrealize:push -DincludeDependencies=true -DskipTests -Paria -f "js-actions"
If this is successful, you will see that the package now exists under the Packages section in Orchestrator:
Pull Actions
Pull this project from the Orchestrator server with the following command:
Tip: You can add additional server-side Actions to the package that was pushed and it will also be pulled down.
mvn clean package vro:pull -DincludeDependencies=true -DskipTests -Paria -f "js-actions"
If you got this far and everything has worked then well done. In future posts, I’ll dive deeper into the different projects that can be created and strategies to manage these in a Git repository.
I have done my best to test all of the solutions in this post, but if you are having trouble getting this to work then please drop a message and I’ll do what I can to help.
[…] This post has been deprecated and an updated version can be found here […]
[…] Build Tools for VMware Aria – Getting Up and Running […]