I often start many of my blog posts describing how to set up a Python virtual environment and install the required modules, when working with Ansible. I have therefore decided to create this post to cover the topic in a bit more detail and for better consistency.
When I am developing Ansible playbooks and depending on the project, I often require a different set of Python modules. I could install all of the modules that I use on the base system, but then it starts to get contaminated and it becomes difficult to manage all of the dependencies.
Another requirement is that I want to be able to test my Ansible playbooks against different versions (maybe environments are using different versions or to test a new release). Fortunately, both of these problems are easy to solve using Python’s venv (Virtual Environments) module.
You don’t need to be using containers to run multiple versions of Ansible for this purpose like I have witnessed many people do.
The benefits of using a virtual environment include:
- Each project can have its own isolated environment and modules;
- The base system is not affected;
- Does not require root access as virtual environments can be created in your home directory;
In the following sections, I will provide details on how to set up virtual environments and some examples of these with Ansible.
Page Contents
Install Python 3
The first thing you need to do is install Python3. You can create virtual environments with Python 2, but as that is going end of life in January 2020, you really should make every effort to move away from this version. We will need to install Python 3.6 or later.
CentOS 7
Python 3 can be installed from one of the following repositories, depending on your preference (but only choose one). Note that this does not change the default ‘python‘ interpreter on the system.
Extra Packages for Enterprise Linux (EPEL)
Install this repository if not already installed:
sudo yum -y install epel-release
Install Python 3:
sudo yum -y install python36 python36-pip
Software Collections (SCL)
Install this repository if not already installed:
sudo yum -y install centos-release-scl
Install Python 3:
sudo yum -y install rh-python36
Inline with Upstream Stable (IUS)
Install this repository if not already installed:
sudo yum -y install https://centos7.iuscommunity.org/ius-release.rpm
Install Python 3:
sudo yum -y install python36u python36u-pip
Ubuntu
Check out this post: https://www.tecmint.com/install-python-in-ubuntu
Verify that Python is installed and working:
python3.6 --version
![]()
Create Virtual Environments
First, we will need to create a folder that we’ll use to store the virtual environments. I recommend that you do not create these environments inside your project folders. I have a folder called ‘python-venv‘ in my home directory, which I use for all my virtual environments.
mkdir ~/python-env
We create a virtual environment using the Python ‘venv‘ module (note that this is built into Python 3):
python3.6 -m venv environment_name
In this example, I am going to create two environments that will provide different versions of Ansible for me to use.
cd ~/python-env

python3.6 -m venv ansible2.7.0

python3.6 -m venv ansible2.8.0
This will create the directories ‘ansible2.7.0‘ and ‘ansible2.8.0‘ under ‘~/python-env‘, that contains the binaries and base libraries for the environment.
Next, we need to activate an environment by sourcing an environment file in the bin directory. Let’s activate the ‘ansible2.7.0‘ environment.
source ansible2.7.0/bin/activate
You will notice that the shell will now display the virtual environment that you are using:
![]()
Currently, this environment has no modules installed. The first thing we will want to do is upgrade ‘pip‘ and ‘setuptools‘.
pip install --upgrade pip setuptools
Next, let’s install ansible 2.7.0. PIP will default to install the latest version, but we can override this using == and force a specific version to be installed.
pip install ansible==2.7.0
Once the installation process completes, we can confirm that the version of Ansible has been installed:
ansible --version

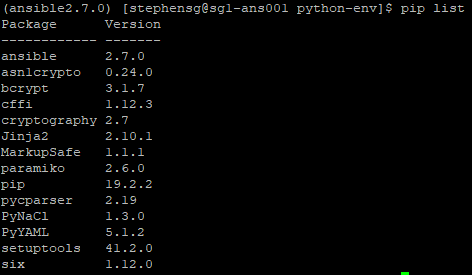
We can also see a list of Python packages that have been installed in this environment using ‘pip list’.
Now, let’s deactivate the environment by simply typing ‘deactivate‘ in the shell.
![]()
You’ll notice that the shell has returned to normal. Also, if you type the ansible command again, it should return as command not found (unless you already had it installed in the base system).
![]()
Now let’s set up the second environment:
source ansible2.8.0/bin/activate

pip install --upgrade pip setuptools

pip install ansible==2.8.0
And if we issue the ansible command again, we’ll see that it’s now version 2.8.0.

You now have two versions of Ansible installed in their own virtual environment. You can use the activate/deactivate process to test your playbooks against different Ansible versions by easily switching between the environments.
Creating a Portable Environment
Now that we have the environments set up, we can use pip to install any packages that we want to use directly into the environment, without risk of contaminating the base system packages. Another feature that we can use is the ability to create a ‘requirements.txt‘ file that can be used to create another environment with exactly the same packages and dependencies installed. This makes it easy for other users to consume your Ansible content and ensure they have the required packages and dependencies installed along with the specific versions that should be used.
Activate one of your environments (or use an environment that you already have activated) and type the following command:
pip freeze
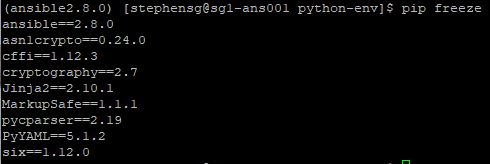
Similar to the ‘pip list‘ command, ‘pip freeze‘ displays all the packages and their versions that have been installed in the environment, but presents them in a specific format that allows them to be understood by ‘pip‘.
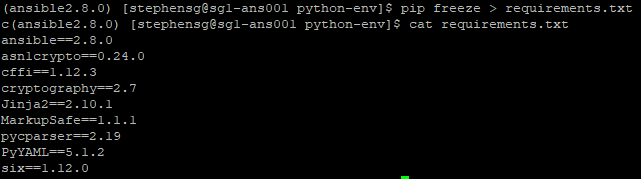
You can export this list to a text file called ‘requirements.txt‘ as follows (usually at the root of your project):
pip freeze > requirements.txt
The default for package requirements is to hard-set the specific version that is installed with ==. However, you can edit the file and change this to >= if you want to install a version that is equal to or greater than the specified version. You can also omit the version altogether and pip will install the latest available. Do note though, that this can be a risk if you have never tested your playbooks on newer versions and can lead to unpredictable outcomes.
Import an Environment based on provided requirements.txt
If a project has a ‘requirements.txt‘ that includes a list of Python packages then it’s really simple to bootstrap the environment using ‘pip install‘ and the ‘-r‘ flag.
Let’s add an additional package to the requirements file first:
echo "requests" >> requirements.txt
And now bootstrap the environment by installing packages specified in the ‘requirements.txt‘ file.
pip install -r requirements.txt
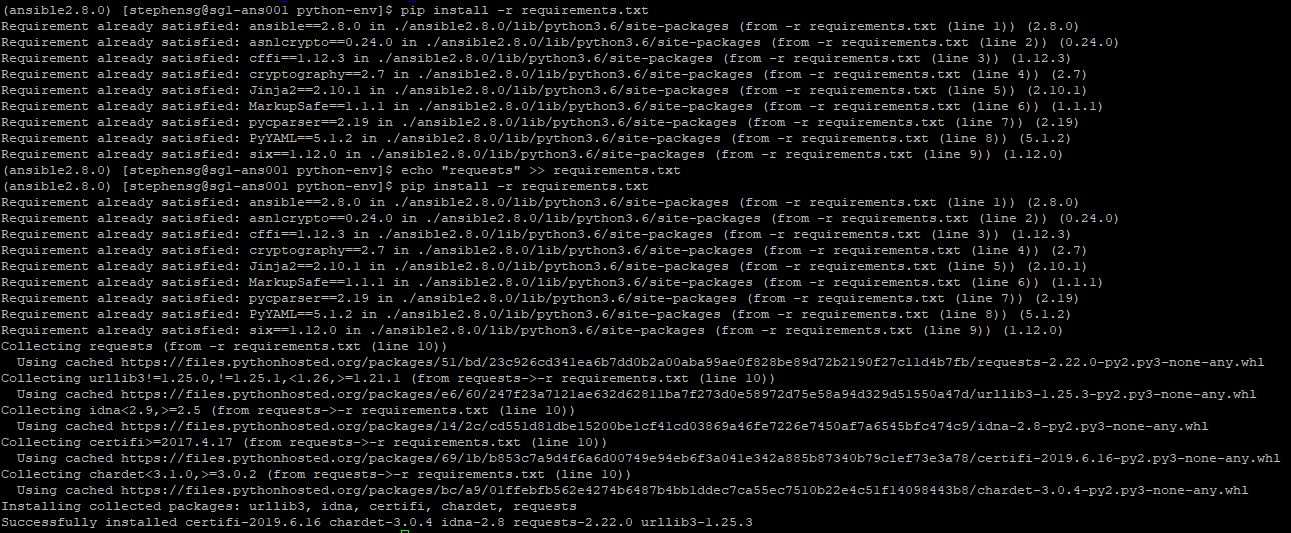
Notice that the existing packages were already satisfied so pip skipped these, but the ‘requests‘ package was not installed and pip installed this because it was defined in the ‘requirements.txt‘ file.
I hope this post has been helpful in your Ansible development efforts (or any Python-based project). As always, feel free to leave a comment or drop me a message via the Drift app.
[…] use Python virtual environments when setting up your Ansible environment. I have created a guide here on how to install Python 3 and how to create and activate a virtual environment, where the […]