Oh what a joy of an upgrade this one was. Not that it was too difficult, just a tad annoying that an inline upgrade was not possible (or maybe just not supported?, I dunno) and the only way to upgrade to vRealize Orchestrator 7.5 was through a new deployment of the external appliance and migrating the content and settings across. Anyway, I thought it might be useful to others to document the process that I followed to achieve this (and as a future reminder to myself).
Page Contents
Before you begin
This process documents the steps to upgrade a single, standalone appliance but the steps are almost identical for a cluster. If you are using a cluster, then ensure the load balancer is disabled and that the databases are in sync before proceeding. You are responsible for ensuring that all your appliances, virtual machines, databases, etc are backed up and/or snapshot before attempting to perform the upgrade.
Make sure to also snapshot the target vRO server! If anything goes wrong during the migration, then you will need to revert to this snapshot before you can attempt the migration again.
Deploy the vRealize Orchestrator 7.5 Appliance
Nothing special here, just deploy the OVA package for the 7.5 appliance and configure it so that you can access it on the network. Make sure to get all the DNS entries in place so that each vRO appliance is able to resolve each other.
Enable SSH Access
You will need to ensure that SSH is enabled on both the source and destination vRO appliance. If you need to do this post-install, then log into the VAMI interface ‘of the vRO appliance (https://vro:5480) and go to the ‘Admin‘ tab.
You need to ensure that ‘SSH service enabled:‘ and ‘Administrator SSH login enabled:‘ are both checked and click ‘Save Settings‘.

Stop Source vRO Service and Configure vPostgres
Open an SSH session to the source vRO appliance (if you’re using Windows then Putty is a decent SSH client). Once logged in, perform the following:
Shutdown vRO service
Run the command ‘service vro-server stop‘. This will perform a graceful shutdown of the vro service.
$ service vro-server stop

Stopping tomcat instance
Instance is running as PID=7020, shutting down...
Instance is running PID=7020, sleeping for up to 30 seconds waiting for shutdown
Instance shut down gracefully
Allow vPostgreSQL to listen on all interfaces
The vPostgre service, by default, is set to listen on the loopback interface. This means that it is not accessible from anything external of the appliance. This will need to be set to listen on all interfaces to allow the migration to the target vRO server to occur. You will see the error message ‘Failed to validate the source vRealize Orchestrator database. org.postgresql.util.PSQLException: Connection to 1.1.1.1:5432 refused.‘
Edit the ‘/var/vmware/vpostgres/current/pgdata/postgresql.conf‘ file.
$ vim /var/vmware/vpostgres/current/pgdata/postgresql.conf
And add the following to the end of the file:
listen_addresses ='*'
Then restart the vpostgres service:
$ service vpostgres restart
Stopping VMware vPostgres... Last login: Sat Oct 13 15:52:49 UTC 2018 on pts/0
ok
Starting VMware vPostgres
Last login: Sat Oct 13 18:53:05 UTC 2018 on pts/1
Allow Target vRO Server to Access Source Server vPostgres Database
An ACL file controls what can access the vPostgres instance and from where. By default this will be set to trust to local server only. This will need to be changed to allow the target vRO server to access this database.
Edit the ‘/var/vmware/vpostgres/current/pgdata/pg_hba.conf‘ file.
$ vim /var/vmware/vpostgres/current/pgdata/pg_hba.conf
Add the following to the end of the file (change the IP address to that of your target vRO server).
host all all 10.1.10.83/32 md5
Then restart the vpostgres service:
$ service vpostgres restart
Stopping VMware vPostgres... Last login: Sat Oct 13 18:53:07 UTC 2018 on pts/1
ok
Starting VMware vPostgres
Last login: Sat Oct 13 19:07:58 UTC 2018 on pts/1
Perform Migration to Target vRO Server
Log in to the VAMI page for the target vRO server. Once logged in, go the ‘Migrate‘ tab. Enter the details for the source and target vRO servers and then click validate.
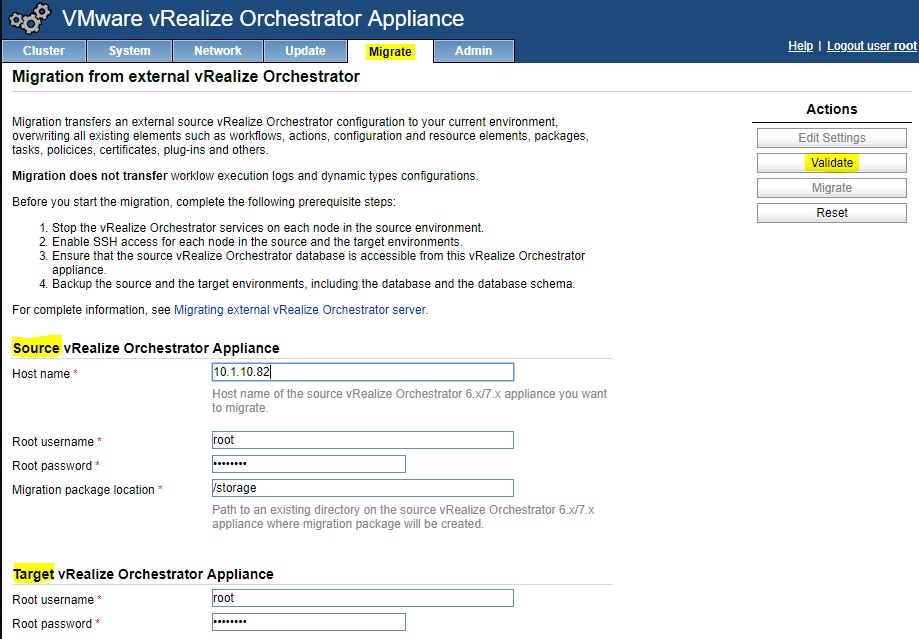
If everything checks out OK then click ‘Migrate‘.
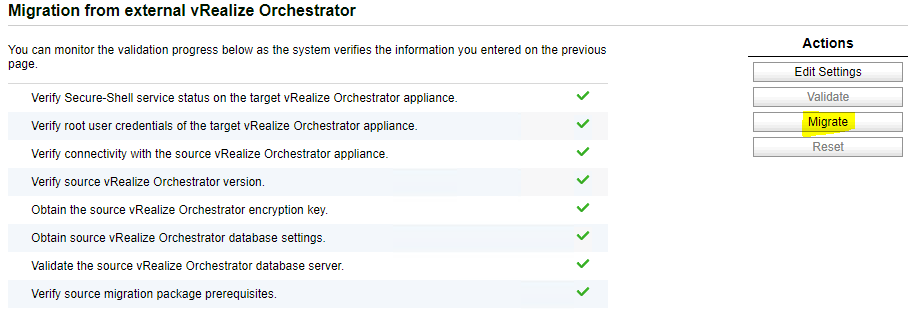
I had an issue the first time that I tried to do this. For some reason the ‘Reinstall the vRealize Orchestrator plug-ins on local node‘ task failed with the error ‘execve() arg 3 contains a non-string value‘. I reverted my snapshot and tried the migration again and it worked without issue. Not sure why this happened but it seemed random.
Configure Control Center on Target vRO Server
Before proceeding further it would be wise to make sure that the old (source) vRO server has been switched off, so that you don’t accidentally connect to vRA to the wrong appliance. Also, make sure that your load balancers and DNS records have been updated to point to the new vRO server(s).
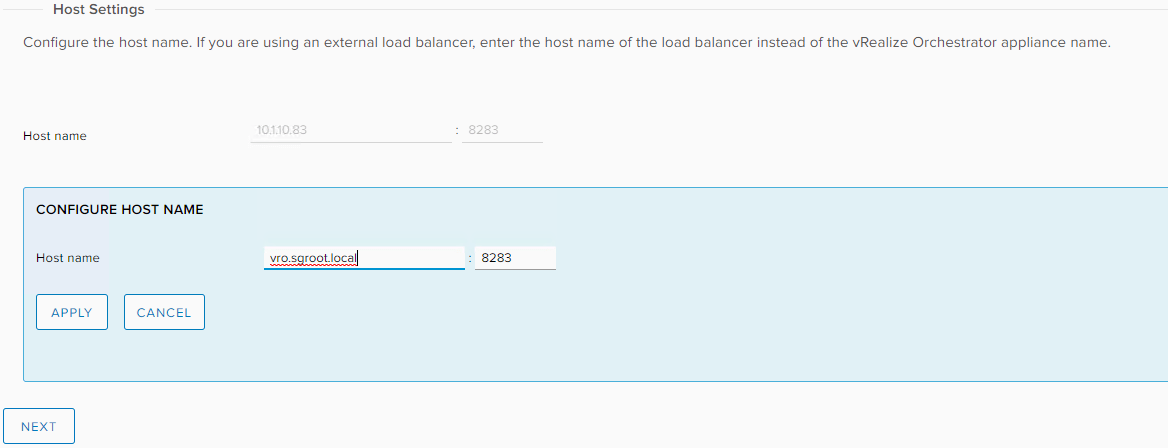
Open a browser to the vRO landing page (https://vro:8281/vco/) and click on the link for ‘Open Control Center‘ under ‘Configure the Orchestrator Server‘. Once you have logged in, the configuration wizard will automatically run and take you through the steps required to get the vRO server in a ready state.
Host Settings
Set the hostname to the load balanced DNS address or the if not using a cluster then the hostname of the vRO server (I’m using a CNAME alias for my standalone server) and click Apply and then Next.
Configure Authentication Provider
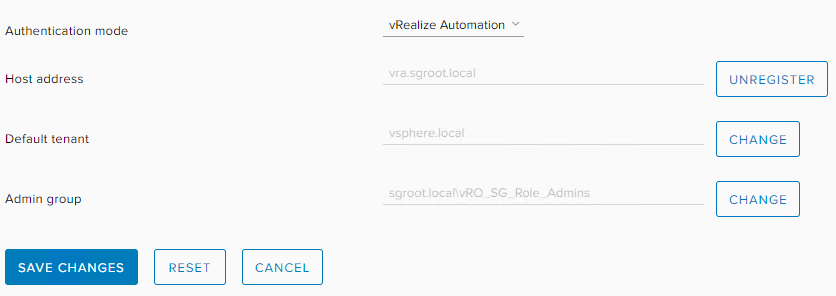
Set the ‘Authentication mode‘ to ‘vRealize Automation‘ and enter the address for the vRA appliance or cluster. Accept the certificate if using self-signed certificates.
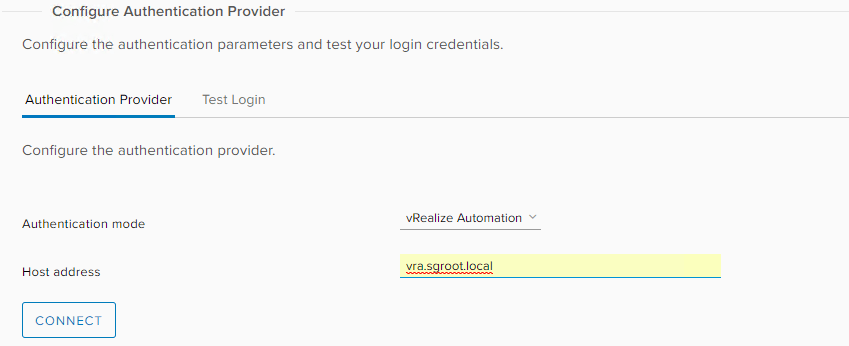
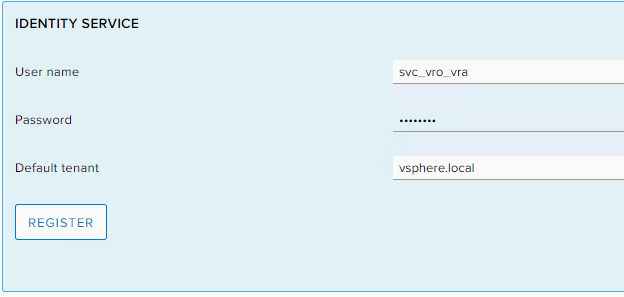
Configure the identity service with a user that has tenant administrator rights for the default tenant you are configuring this instance for (I’m using vsphere.local in my lab but I also add additional tenants to this vRO server later) and then click ‘Register‘.
Finally, select an ‘Admin group‘ that users who are a member of, will gain administrative privileges to the vRO server and click ‘Save Changes‘.
The vRO services will automatically restart and apply the changes, so grab a coffee and wait a good 10 minutes for everything to come back up.
Log into vRealize Orchestrator Client
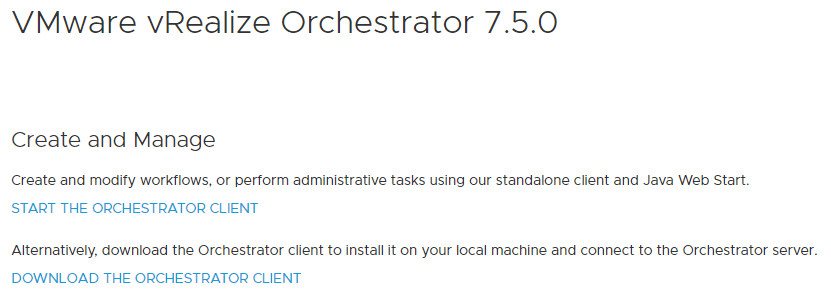
Open a browser to the vRO landing page (https://vro:8281/vco/) and click on the link to ‘Start the Orchestrator Client‘ to use the Java web app or ‘Download the Orchestrator Client‘ to download a local copy of the java client.
Once the Orchestrator Client appears, you should be able to log in with an account that is a member of the Admin group that was configured previously.

I appreciate that many of you performing this upgrade are likely doing so within complex vRA or clustered environments. There are so many things that could go wrong and I would be willing to offer advice if you get in touch with me. Good luck!