- IaC for vRealize: Deploying vRealize Build Tools To Allow Infrastructure As Code for vRA and vRO
- IaC for vRealize: Manage Existing vRO Code With vRealize Build Tools & Set up Git Repositories
- IaC for vRealize: Define Dependencies, Manage Versions, Prepare & Release Packages & Deploy Artifacts
- IaC for vRealize: Documenting Code with JSDoc and Syntax Checking and Code Style Management with ESLint
- IaC for vRealize: Updating Archetypes and Adding Boilerplate For Your vRO Actions
Page Contents
This post has been deprecated and updated content can be found here
In my previous post on Deploying vRealize Build Tools To Allow Infrastructure As Code for vRA and vRO, I covered how to set up the CI infrastructure and your developer workstation, in preparation for managing your vRO code as projects with Visual Studio Code and Maven. In this post, I will explain how you can work with your existing code base and manage it using the build tools. A major part of this will be creating and managing new projects that will map to our existing code in vRO.
Once projects have been created, I will detail how Git repositories can be used to store and manage your vRO code, and then we can map your project dependencies and allow development teams to work collaboratively, without risk of overwriting the work of others (a major problem when developing using the vRO client). Git is going to bring some very useful processes and methodologies to the table such as branching, tagging and merge conflict resolution.
I also want to point out that I am currently only focusing on Actions, as I believe this is where all your code should exist. I will have followup posts that will cover strategies for managing Workflows and other items.
Setting Up GitLab
One thing that I didn’t cover in my previous post, was setting up Git. I purposely reserved this topic for this post, as it was more relevant. To start, you will need to have a GitLab server deployed that can be used to create the repositories for storing your vRO projects. You can use GitHub if you so wish, it doesn’t matter too much, but using GitLab doesn’t require that your environments have access to the Internet. GitLab also allows you to create groups to organise multiple repositories, which is going to be useful.
If you need to install GitLab, then there is a good guide on VULTR, that details how to install GitLab and enable HTTPS.
Create User
You should be using your user account when working with Git and not the default root account. So log into the admin area and create a new local account for your personal use. Alternatively, you can also configure GitLab to allow users from Active Directory to log in, you can use the guide provided by Git here.
Create a Personal Access Token
Once you have a Git user account set up, you will need to create a Personal Access Token. An Access Token can be used instead of a password when authenticating with Git over HTTPS. This will provide safer storage of user credentials in the Git configuration files.
Click on the profile icon on the top right of the page and select Settings:
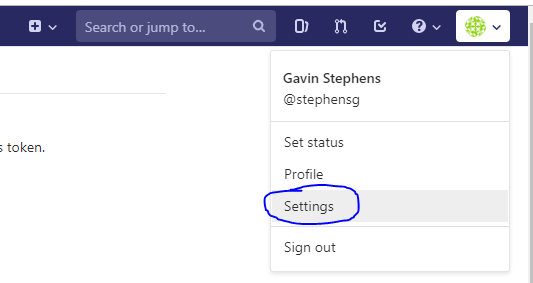
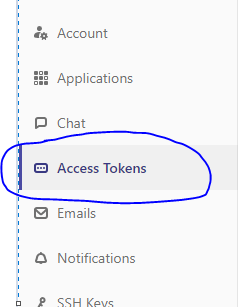
On the Settings page select Access Tokens.
On the ‘Add a personal access token‘ page, give the access token a name and the ‘write_repository‘ permissions. Set an expiry date if you wish, or leave blank to never expire.
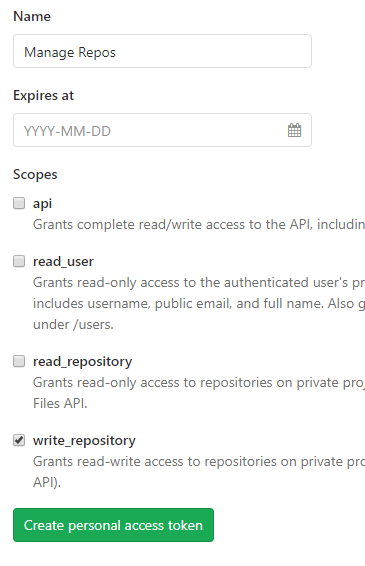
Once you click ‘Create personal access token‘, the token will be displayed. You will need to copy and save this token somewhere safe as you will not be able to view it again. If you lose this token, you will have to create a new one to replace it.
Create a Group
A Group allows multiple projects/repositories to be created under a single namespace. This is useful when a project spans many repositories and you need to keep these together so that they are easy to locate and manage. Our vRO projects will be using multiple repositories, therefore we’ll great a Group for these. A Group also simplifies granting access to projects, as collaborators can be granted access to the group and inherently, the projects it contains.
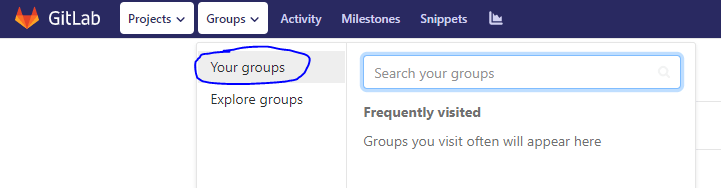
To create a new group, select ‘Groups‘ from the main menu at the top and then select ‘Your groups‘.
Click the ‘New group‘ button and give your group a name and settings that you require (I simply called my group ‘vRO’).
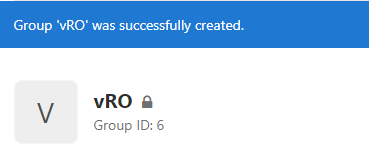
We will create all vRO projects under this new group.
Install Git Client
You will also need to install the Git client for your workstation. You can download the client for your OS here.![]()
Manage Existing vRO Code Repository
Our existing code repository is located within the vRO appliance. To manage this repository using VSCode, we will need to organise it and turn it into a set of manageable packages. If you haven’t already read it, I created a post on vRealize Orchestrator: Standardising Modules & Actions, where I discussed strategies to organise your vRO code well. If your repository has a similar structure, then you will have a much easier time working with your code and handling dependencies.
One thing to note is that code is always distributed as vRO packages. Projects that we create in VSCode, will be imported into vRO via a package and vice versa getting code out of vRO.
Document Existing vRO Modules
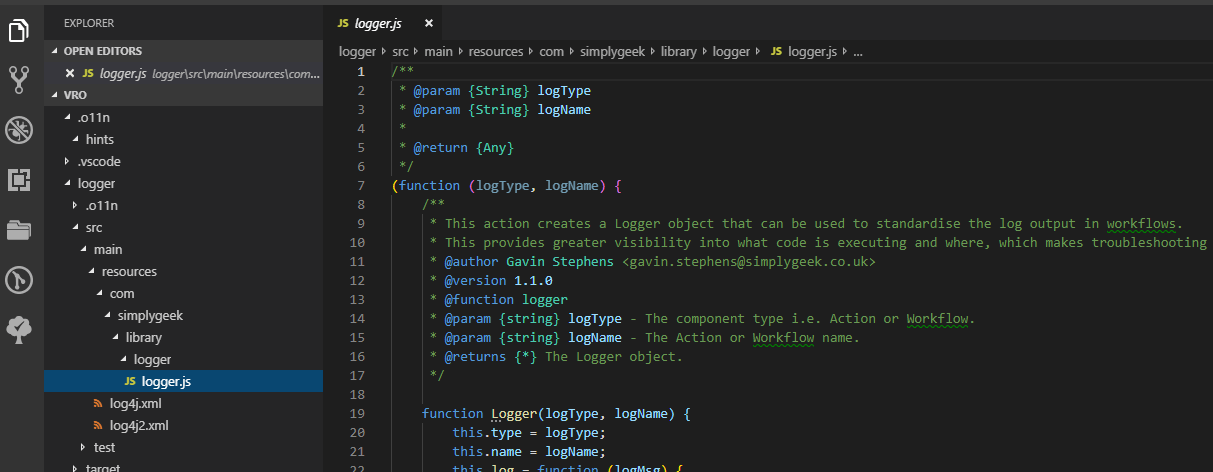
I would highly recommend that you document your current vRO modules so that you understand what the projects will look like. When you are creating projects with the vRealize Build Tools, you need to set the ‘groupId‘ and ‘artifactId‘ properties. The ‘groupId‘ will most likely be a common prefix used on all your modules. For my code, this is always ‘com.simplygeek.library‘. The ‘artifactId‘ will be the main topic, i.e. NSX. where all sub-topics are related to NSX and part of the same package.
Below are some examples of modules that I currently have in vRO (and I will continue to use these as examples for everything that follows):
- com.simplygeek.library.logger
- com.simplygeek.library.rest
- com.simplygeek.library.nsx.rest
- com.simplygeek.library.nsx.rest.edge
- com.simplygeek.library.nsx.rest.securitygroups
Notice that I have 3 modules listed that are NSX related, and will be part of the same package.
I would recommend creating a table as follows to map the modules to their respective ‘groupId‘ and ‘artifactId‘ properties.
| groupId | artifactId |
| com.simplygeek.library | logger |
| com.simplygeek.library | rest |
| com.simplygeek.library | nsx |
You are now ready to begin packaging and exporting these onto your local workstation, where you can manage the code using VSCode and store as repositories in Git.
Export Existing vRO Code
There is no way that I currently know of to export existing code or packages out of vRO without first creating a new project. Therefore, we will create a set of new projects based on the information in the previous section. Once these have been created, we’re going to push the empty packages to vRO and then populate them with your Actions. Once this has been completed, we are then going to pull the packages, along with all the Actions. We will then have all of the code exported out of vRO.
Create a New Project
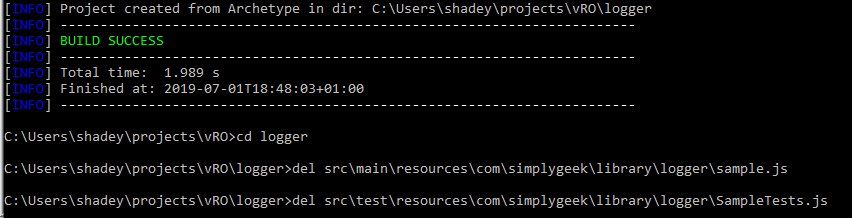
If you followed my previous post, you should already have a projects folder created where the vRO code can be stored. Open a command prompt to this folder and issue the following command to create a new project (FYI: mine are located at c:\users\<user>\projects\vRO):
mvn archetype:generate -DinteractiveMode=false -DarchetypeGroupId=com.vmware.pscoe.o11n.archetypes -DarchetypeArtifactId=package-actions-archetype -DarchetypeVersion=1.5.11 -DgroupId=com.simplygeek.library -DartifactId=logger

When the command completes, a new folder will be created that is named by the artifactId. Move into this new directory and delete the ‘sample.js‘ and ‘sampleTests.js‘ files.
Now push the empty package to the vRO server using the following command:
mvn package vrealize:push -Pdevelopment
where ‘development‘ is the name of your vRO profile in ‘settings.xml‘. If successful, the build will complete similar to below.
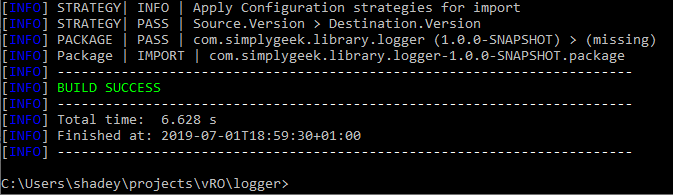
A package will now appear under ‘Packages‘ in vRO.
![]()
Add Existing Code To Package
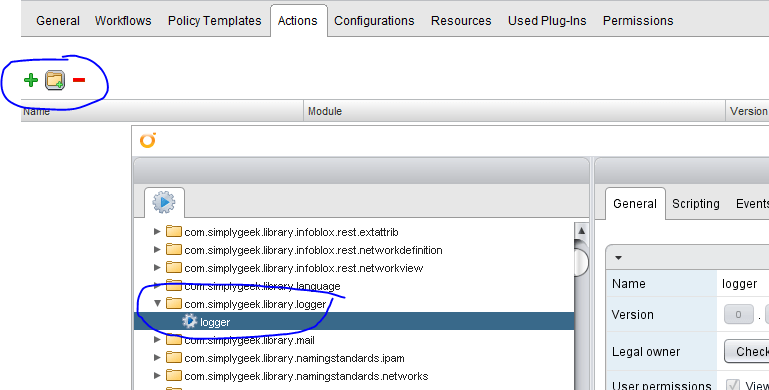
Now that you have created a new project and pushed an empty package to the vRO server, the next task is to populate this with your existing code, that is relevant to the project. In this example, I am working with my ‘logger’ project where I have just a single Action. in vRO, I need to add this Action to the package:
I simply need to edit the ‘com.simplygeek.library.logger-1.0.0-SNAPSHOT‘ package and add the relevant Actions.
If you are wondering about the version numbers and SNAPSHOT tags, then I will be covering these, in more detail, in my next post.
Make sure to save the package once you have added the Actions. One important thing to be aware of is vRO’s package manager may automatically add dependent Actions. If this happens, you will need to manually remove these. If there are many, then the easiest way is to sort the Actions by module and remove Actions that are listed from other modules.
Once you have completed this you will need to pull the updated package from vRO using the following command:
mvn vro:pull -Pdevelopment

You will now see that the Actions that were added to the package in vRO are now editable within VSCode.
Repeat this process for all of your projects.
Create & Add Code to Git Repository
Now that we have all the projects set up and vRO code is now editable from your workstation using VSCode, it’s time to set up the Git repositories. We are going to create a repository for each project as this will allow collaboration on individual projects more streamlined.
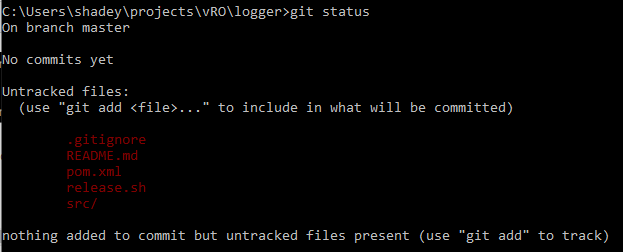
The first thing we will need to do is initialise the current folder, using my ‘logger‘ project as an example:
git init

This will initialise a local Git repo that can now be used to commit your code. If you type ‘git status‘, you will see that all files currently in the folder are untracked.
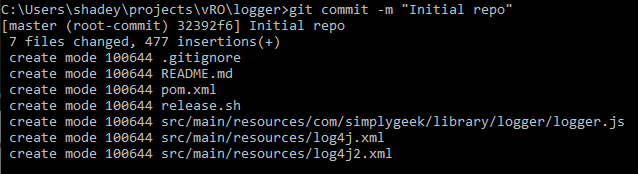
Simply add these files and commit to the repository:
git add -A
git commit -m "Initial repo"
We now need to add a remote origin server (GitLab) that we can push the repository to.
git remote add origin https://git.sgroot.local/vRO/logger.git
Where ‘git.sgroot.local‘ is the hostname of my GitLab server, ‘vRO‘ is the name of the group I created, and ‘logger‘, the name of my project.
We also need to update the ‘<developerConnection>‘ tag in the ‘pom.xml‘ file to the scm git connection, using the origin url for the repository (i.e. https://git.sgroot.local/vRO/logger.git).
<developerConnection>scm:git:https://git.sgroot.local/vro/logger.git</developerConnection>
Then commit this change:
git add pom.xml
git commit -m "Updated scm git connection"
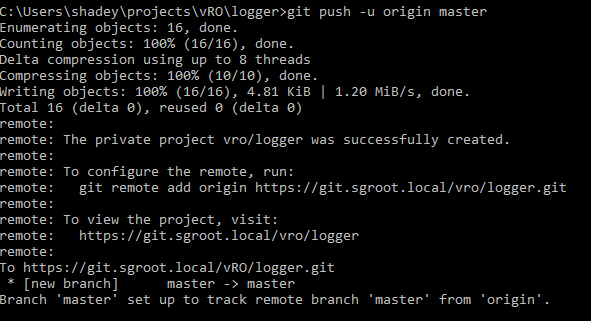
Finally, we just need to push the code upstream (if you are prompted for credentials, provide the username you use to log in to GitLab and the Access Token as the password):
git push -u origin master
Once again, repeat this process for all of your projects.
Once you have completed all these steps for your projects, you should see these listed under the group you created earlier in GitLab:
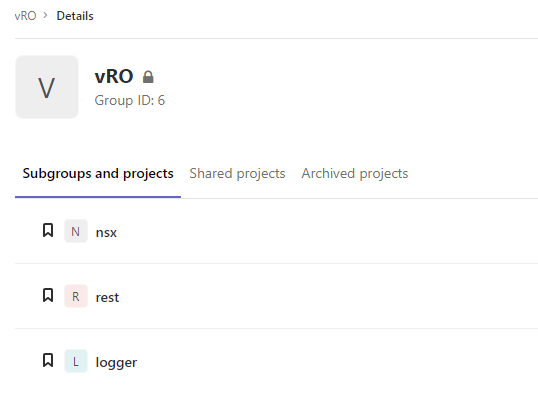
Great work, you have successfully broken down your vRO repository into manageable projects that are checked into Git and editable using VSCode.
In my next post, I am going to cover managing dependencies and take a look at version management using the built-in Maven plugins. I will go over what SNAPSHOT’s are and how to version code so that it is production-ready, as well as go through the release process.
As always, thanks for reading and if you discover any issues or need some help, then reach out to me on the Drift app.
Error when attempting to pull the package after a successful creation/push/update. Amything look familiar?
[INFO] ————————————————————————
[INFO] BUILD FAILURE
[INFO] ————————————————————————
[INFO] Total time: 10.660 s
[INFO] Finished at: 2019-09-23T18:12:19-04:00
[INFO] ————————————————————————
[ERROR] Failed to execute goal com.vmware.pscoe.maven.plugins:o11n-actions-package-maven-plugin:1.5.11:pull (default-cli) on project logger: Execution default-cli of goal com.vmware.pscoe.maven.plugins:o11n-actions-package-maven-plugin:1.5.11:pull failed: An API incompatibility was encountered while executing com.vmware.pscoe.maven.plugins:o11n-actions-package-maven-plugin:1.5.11:pull: java.lang.NoSuchMethodError: ch.dunes.model.pkg.impexp.PackageFileManager2.getPacakgeInfo(Ljava/lang/String;)Lch/dunes/model/pkg/impexp/PackageInfo;
Hi Jeff. Apologies for not getting back sooner. Can you confirm the vRO version? I am assuming you are using vRO 7.6?
Hey Gavin – yes I am.
I’ve encountered the same problem. I confirmed with the coe team that it’s an issue when using vro 7.6. A new version of the build tools fixes this and was due for release but hasn’t dropped yet. I’ll see what I can find out.
i believe you eluded to this in Part 1 of the series. But support advised the solution is to upload the 7.3 jars to the repository, instead of using the 7.6 library.
Hey Jeff. Have you tried this and with any success?
Hey Gavin – yes using the JARs from VRO 7.3 is working for all versions of vRealize Build Tools (1.5.11 and 1.7.1). I had major problems when using JARs from any other version of VRO (even after updating the POM versions). I would advise users to just take the extra time and get the 7.3 JARs.
Hi Jeff. Thanks for that info, that is super useful. I had hoped using the same version of JAR’s that came with vRO being deployed would work (saving users from having to get access to and deploy the older appliance). I guess I got lucky when I was using 7.5 as this seemed to work OK too (not tested with 7.6 or 8.0). I’ll have a chat with the devs and see what they plan to do about that. I’ll get this content updated with your findings.
Also – looks like VRO 8.0 release includes Git integration when using a VRA license. But, the new HTML5 interface is a disaster IMO. I won’t be advising clients to upgrade any time soon.