If you have read any of my posts, you will quickly discover that I use Ansible a lot, for deploying virtual machines and VMware OVA appliances, on vSphere.
Ansible support for VMware is constantly growing and in the latest versions, it has become an essential tool that I use as part of my development process for standing up required infrastructure that is easy and quick to deploy or tear down. The key part of using Ansible for my deployments is that the process is repeatable and consistent.
In this post, I am going to cover some of the core Ansible modules that I use to perform these deployments and provide various use case examples. Once you understand these modules and lay down the groundwork, you’ll be deploying virtual machines or appliances in mere minutes, with the simple editing of some configuration files.
If you are not too familiar with what Ansible is, or what it’s used for, then I recommend that you check out the official documentation. You can also get a brief overview of what Ansible is at cloudacademy.com, and there is a wealth of online training and other material available to get you up to speed.
All examples used in this post, including a fully working Ansible solution, can be found on my Ansible-VMware Github.
Page Contents
Pre-requisites
You will need to have the following packages installed (through PIP) on your Ansible control machine:
- ansible>=2.8.0
- pyvmomi>=6.7.1.2018.12
I have also provided a requirements.txt file that you can install using PIP
pip install -r requirements.txt
Deploying Virtual Machines
The most basic task that you are ever likely to perform on any vSphere environment, is the deployment of a virtual machine. In this section, I am going to show you how Ansible can make the task of spinning up dozens of virtual machines a breeze.
Ansible provides the core module vmware_guest that can be used to create a new virtual machine or clone from an existing virtual machine template.
In these examples, I am going to demonstrate how you can create new virtual machines or clone an existing virtual machine from a template for both Windows and Linux, perform customization and configure hardware and advanced settings.
Create a New Virtual Machine (no template)
This is an example play that will create a virtual machine with no OS installed (not from a template). When the virtual machine is powered on, it will automatically try and PXE boot from the network, which can be useful in deployment pipelines where VMs are bootstrapped in this way.
I have a simple play called ‘vmware_create_virtual_machine.yml‘, which includes the tasks to create a virtual machine in VMware vSphere.
---
- hosts: local
  become: no
  gather_facts: False
  vars:
  tasks:
  - name: Create a New Virtual Machine
    vmware_guest:
      hostname: <vcenter hostname>
      username: <vcenter username>
      password: <vcenter password>
      validate_certs: no
      name: Linux_VM
      datacenter: SG1
      cluster: SG1-CLS-MGMT-01
      folder: /SG1/vm
      guest_id: centos7_64Guest
      disk:
      - size_gb: 20
        type: thin
        datastore: vsanDatastore
      hardware:
        memory_mb: 2048
        num_cpus: 1
        scsi: paravirtual
      networks:
      - name: Management
        device_type: vmxnet3
      state: poweredon
    delegate_to: localhost
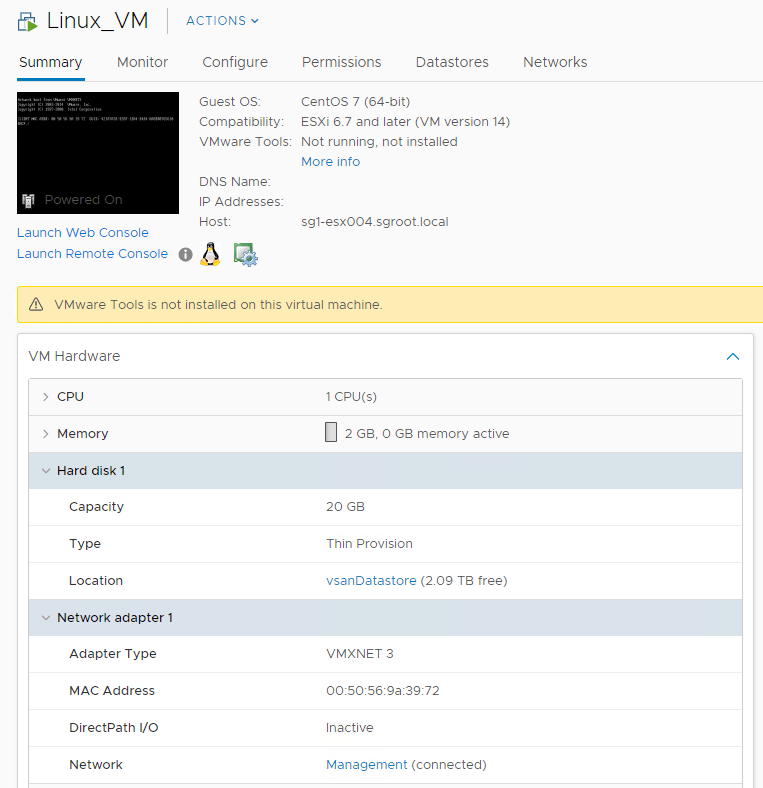
Many of the properties should be self-explanatory, but we’re creating a virtual machine called Linux_VM, with 1 CPU, 2GB of Memory, a 20GB think hard disk, etc.
Because we are creating a new virtual machine, the guest_id needs to be provided, which sets the Guest Operating system profile on the VM. You can get the full list of supported guest_ids from the VMware developer support page.
To run the playbook, I invoke the ansible-playbook command.
ansible-playbook vmware_create_virtual_machine.yml

You can see that the execution was successful (ok=1) and that a change was made (changed=1), which means the virtual machine was created. If we take a look at vCenter we can see the virtual machine now exists, with the specified configuration:
Update Virtual Machine
The great thing about Ansible is that if you were to run this play again, it would not try and create another VM. Instead, it will simply exit with a status of OK, if it discovers that the specified virtual machine already exists and is powered on.

But what if we made some changes to the configuration that we want to apply to the virtual machine? Well, Ansible will only make these changes to the virtual machine if the ‘state‘ parameter has been set to ‘present‘ in the play. Also, if you are making configuration changes to hardware, then the virtual machine may also need to be powered off first (Ansible will display an error if this is required).
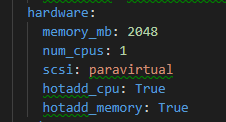
So let’s assume that the virtual machine is powered off and we want to enable CPU and memory hot add support. We simply add these configurations under the hardware section:
Now if we run the play again:

And we can see that a reconfigure task is performed on the VM in vCenter server.

Make sure to check the documentation for all the parameters that can be configured.
Create a Virtual Machine From an Existing Template
The most common use case of deploying a virtual machine is from an existing template. The vmware_guest module provides a ‘template‘ parameter that is used to specify what virtual machine template should be used to clone from when creating the new virtual machine.
You are also able to use the ‘customization‘ or ‘customization_spec‘ parameters to perform guest customization on the virtual machine to configure the network, set administrator password, or join the server to the domain (Windows only).
Create a Linux Virtual Machine from Template
In this example, I am going to show you how to provision a Linux virtual machine from an existing template.
You will need to have a virtual machine template created in vCenter, with the following requirements:
- The latest version of VMware tools installed; I recommend using open-vm-tools, which is included in the repositories for most major distributions.
- Make sure that PERL is installed or customization will fail.
So let’s take a look at a play that will deploy a Linux VM from a template and perform customization:
---
- hosts: local
  become: no
  gather_facts: False
  vars:
  tasks:
  - name: Create a Linux Virtual Machine
    vmware_guest:
      hostname: <vcenter hostname>
      username: <vcenter username>
      password: <vcenter password>
      validate_certs: no
      name: Linux-VM
      datacenter: SG1
      cluster: SG1-CLS-MGMT-01
      folder: /SG1/vm
      template: CENTOS7_TMPL
      datastore: vsanDatastore
      hardware:
        memory_mb: 2048
        num_cpus: 1
      networks:
        - name: Management
          ip: 192.168.10.11
          netmask: 255.255.255.0
          gateway: 192.168.10.254
      customization:
        domain: sgroot.local
        dns_servers:
          - 10.1.10.10
          - 10.1.10.11
        dns_suffix:
          - sgroot.local
      wait_for_ip_address: True
      state: poweredon
    delegate_to: localhost
You can see that I have specified the ‘template‘ parameter with ‘CENTOS7_TMPL‘, which is the name of my template in vCenter. I have also specified the ‘datastore‘ parameter of where the virtual machine should be stored because this will default to the same location as the template.
I have also added the ‘customization‘ parameter, providing network and DNS configuration that will be set on the virtual machine through guest customization. You could also use the ‘customization_spec‘ parameter instead and specify a customization specification that exists in vCenter. I’d rather not have the dependency and always use ‘customization‘.
I have also set the ‘wait_for_ip_address‘ parameter. When this parameter is set to true, the play will wait for vCenter to detect the IP address on the virtual machine before completing. This is great for ensuring that the play does not continue until the virtual machine is available on the network.
You can also configure some hardware parameters such as the CPU and memory that you require (does not have to match the template).
To run the playbook, I invoke the ansible-playbook command.
ansible-playbook vmware_create_linux_vm.yml
While the playbook is executing, you will see a clone operation in vCenter:

The play will complete as expected:

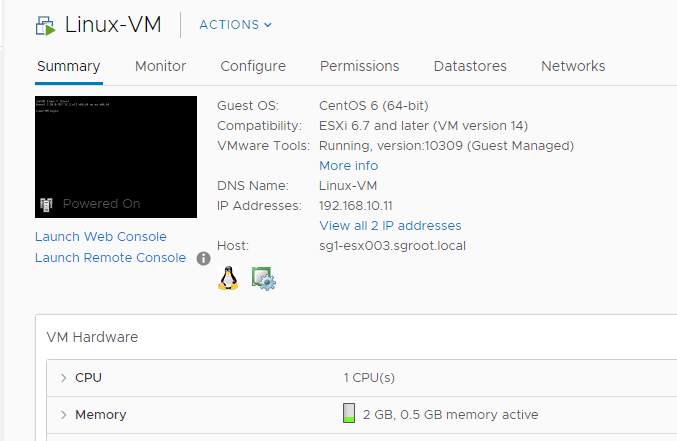
And you should see your new virtual machine in vCenter with the IP address and hostname displayed:
Create a Windows Virtual Machine from Template
Deploying a virtual machine from a Windows template uses the same play as the Linux deployment, but allows for some additional customization, such as adding the virtual machine to Active Directory and setting the administrator password.
Here is a Windows play that will deploy a virtual machine, perform customization and join the machine to the Active Directory domain:
---
- hosts: local
  become: no
  gather_facts: False
  vars:
  tasks:
  - name: Create a Windows Virtual Machine
    vmware_guest:
      hostname: <vcenter hostname>
      username: <vcenter username>
      password: <vcenter password>
      validate_certs: no
      name: Windows-VM
      datacenter: SG1
      cluster: SG1-CLS-MGMT-01
      folder: /SG1/vm
      template: 2012R2_TMPL
      datastore: vsanDatastore
      hardware:
        memory_mb: 4096
        num_cpus: 2
      networks:
        - name: Management
          ip: 10.1.10.119
          netmask: 255.255.255.0
          gateway: 10.1.10.254
          domain: sgroot.local
          dns_servers:
          - 10.1.10.10
          - 10.1.10.11
      customization:
        hostname: Windows-VM
        dns_servers:
        - 10.1.10.10
        - 10.1.10.11
        timezone: 085
        domain: sgroot.local
        password: VMwar3!!
        joindomain: sgroot.local
        domainadmin: svc_dom_join@sgroot.local
        domainadminpassword: VMwar3!!
      wait_for_customization: yes
      wait_for_ip_address: True
      state: poweredon
    delegate_to: localhost
Here you will see that there are additional parameters in ‘customization‘ that will automatically join the virtual machine to the Active Directory domain. The ‘password‘ parameter is also used to set the default Windows Administrator account password. I am also configuring the ‘timezone‘, which accepts a numerical code, of which a list can be found here: https://docs.microsoft.com/en-us/previous-versions/windows/embedded/ms912391(v=winembedded.11).
There are also additional parameters ‘domain‘ and ‘dns_servers‘ under ‘networks‘, which are specific to Windows.
The play will complete as expected:

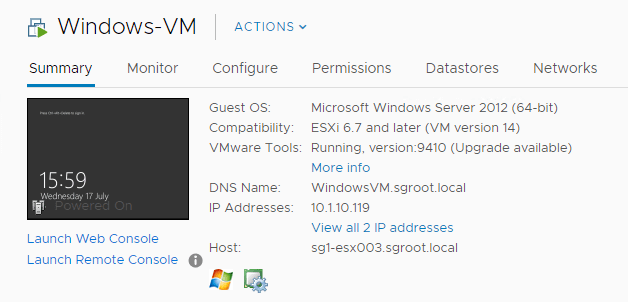
And you should see your new virtual machine in vCenter with the IP address and hostname displayed, as well as the domain.
Also, if I look in Active Directory Users and Computers, under the Computers container, I can see the machine has been added to the domain:
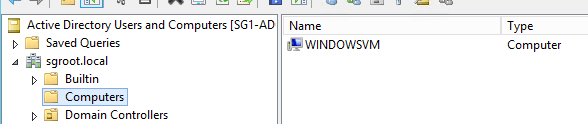
Windows automation made easy!
Using Linked Clones
A feature that saves me an enormous amount of time and resources is Linked Clones. A Linked Clone is a virtual machine whose disks reference a parent disk and only data that is written/changed is committed to the virtual machine’s disk (similar to snapshot technology). This is a popular feature that is used for the deployment of VDI virtual machines in EUC environments but is equally useful in development environments. What is interesting, is that you can’t provision linked-clone virtual machines from the vSphere clients.
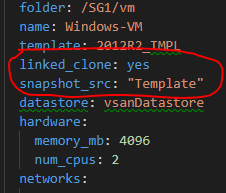
If you want to deploy virtual machines as linked clones, you will first have to convert the template that you are cloning from, back into a virtual machine. You will then need to create a snapshot on this virtual machine (I called it ‘Template’).
To use linked-clones, you need to specify the ‘linked_clone‘ parameter and set to ‘true’ or ‘yes‘ and the ‘snapshot_src‘ parameter to specify the name of the snapshot.
Now, you will see virtual machines provision in mere seconds!
Deploying OVA Appliances
Ansible provides the vmware_deploy_ovf module that can be used to deploy OVA/OVF appliances. I find this module useful when I am automating the deployment of vendor appliances, many of which are VMware’s. Despite the name of the module, OVA and OVF files are interchangeable.
So let’s look at a play that can be used to deploy the VMware vIDM appliance (it doesn’t matter what appliance you deploy, the principle is the same for all):
---
- hosts: local
  become: no
  gather_facts: False
  vars:
  tasks:
  - name: Deploy VMware Identity Manager OVA
    vmware_deploy_ovf:
      hostname: sg1-vsa001.sgroot.local
      username: administrator@vsphere.local
      password: VMwar3!!
      validate_certs: no
      name: VMware-vIDM
      datacenter: SG1
      folder: /SG1/vm
      cluster: SG1-CLS-MGMT-01
      datastore: vsanDatastore
      disk_provisioning: thin
      networks:
        "Network 1": Management
      ova: /mnt/iso/VMware/vIDM/3.3/identity-manager-3.3.0.0-10084102_OVF10.ova
      allow_duplicates: no
      power_on: yes
      fail_on_spec_warnings: yes
      wait: yes
      wait_for_ip_address: yes
      inject_ovf_env: yes
      properties:
        vami.hostname: vmware-vidm.sgroot.local
        vami.ip0.IdentityManager: "10.1.10.120"
        vami.netmask0.IdentityManager: "255.255.255.0"
        vami.gateway.IdentityManager: "10.1.10.254"
        vami.DNS.IdentityManager: "10.1.10.10"
        vami.domain.IdentityManager: sgroot.local
        vami.searchpath.IdentityManager: sgroot.local
        ceip.enabled: yes
        vamitimezone: "Europe/London"
    delegate_to: localhost
So we have very similar parameters used as with the vmware_guest module. There are some additional ones, most of which are self-explanatory. However, let’s have a look at the ones that aren’t.
The value for the ‘networks‘ and ‘properties‘ parameters are specific to the ova appliance that you are deploying. To determine what these values should be, you will need to open the ovf file in a text editor (if you have an OVA, then you will need to extract the ovf file from this first – It’s just a zip file).
Determine Network
To determine the value for ‘networks‘, we need to specify a key: value for the network name and label.
To get the network name, look for a <NetworkSection> tag. Below is how this looks within the VMware vIDM ovf:
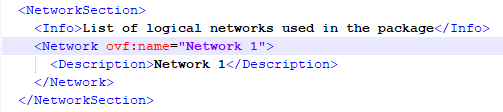
We can see that the name of the network is ‘Network 1‘.
The network label is simply the network in vCenter that you wish to connect the appliance to.
Determine Properties
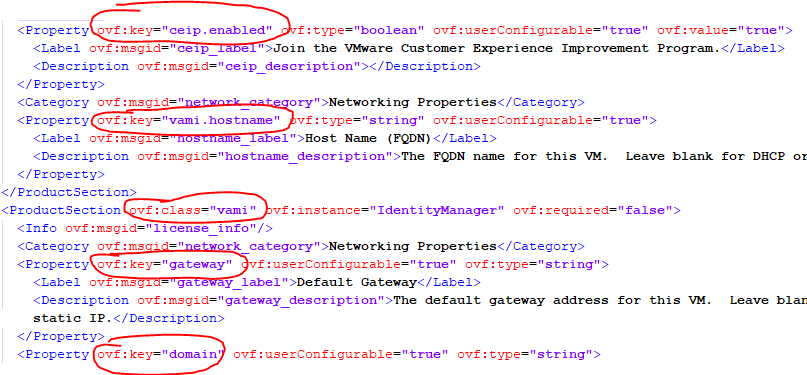
Obtaining the ovf properties is not so straight forward. You are looking for a set of </Property> tags that contain the ‘ovf:key‘ attributes. Some of these will be exactly as is, others will be determined from a combination of ‘ovf:class‘ and ‘ovf:key‘. Below is an example of these property definitions:
You could work these out and with some trial and error deployments, get it right. But an easier way would be to simply deploy the appliance manually first. When the appliance is deployed, you can inspect the ovf settings within the vSphere client by going to the configuration of the virtual machine.

Here, we can see all of the required properties.
The ‘inject_ovf_env‘ parameter is also being set, which will inject the properties into the OVF Environment through VMware Tools (this is required for deploying some appliances and previously could only be achieved using the OVFTool).
Deploy the Appliance
To deploy the appliance, run the playbook by invoking the ansible-playbook command.
ansible-playbook vmware_deploy_ova.yml
While the play is executing, you will see a ‘Deploy OVF Template‘ operation in vCenter:

When this operation is complete, your appliance will be deployed and configured as per the properties specified.
Creating Re-usable Deployment Playbooks
All of the examples that I have provided so far have been to demonstrate the functionality of the Ansible VMware modules by using simple plays. These plays are not scalable and would have to be changed every time you want to deploy another virtual machine or ova appliance.
A better option is to make better use of Ansible variables and roles and use a playbook that brings these all together. This way, you can have a set of roles that perform the task, but these could be used for dozens or even hundreds of deployments.
Extending on the previous examples, I have created 3 new Ansible roles:
- vmware_create_virtual_machine
- vmware_deploy_linux_vm_from_template
- vmware_deploy_windows_vm_from_template
Let’s take a look at the tasks file for the role ‘vmware_create_virtual_machine‘:
---
- name: Create a New Virtual Machine
  vmware_guest:
    hostname: "{{ vcenter_hostname }}"
    username: "{{ vcenter_username }}"
    password: "{{ vcenter_password }}"
    validate_certs: "{{ ova_validate_certs }}"
    datacenter: "{{ vcenter_default_datacenter }}"
    cluster: "{{ vcenter_default_cluster }}"
    folder: "{{ vcenter_default_folder }}"
    name: "{{ inventory_hostname_short | upper }}"
    guest_id: "{{ vm_guest_id }}"
    disk:
    - size_gb: "{{ vm_disk_size }}"
      type: "{{ vm_disk_type }}"
      datastore: "{{ vm_disk_datastore }}"
    hardware:
      memory_mb: "{{ vm_hardware_memory_gb * 1024 }}"
      num_cpus: "{{ vm_hardware_cpu }}"
      scsi: "{{ vm_hardware_controller }}"
    networks:
    - name: "{{ vm_network_label }}"
      device_type: "{{ vm_network_type }}"
    state: poweredon
  delegate_to: localhost
Here we can see that most of the parameters will have their values determined from a variable ‘{{ var }}’. We can define these variables in several places and follow the Ansible rules for variable precedence. For simplicity sake, I declare variables in two places, under ‘inventory/group_vars/all’, which are global to all hosts and under ‘inventory/host_vars’, where a set of variables is defined specifically for each host in the inventory.
All hosts are defined in the ‘inventory/hosts‘ file and placed in their appropriate groups. See the official Ansible documentation if you need to become more familiar with the inventory and defining variables (the docs do a really good job of explaining this).
This is what a host-specific variable file might look like:
---
vm_guest_id: centos7_64Guest

# VM Hardware
vm_hardware_memory_gb: 2
vm_hardware_cpu: 1
vm_hardware_controller: paravirtual

# VM Disk
vm_disk_size: 20
vm_disk_type: thin
vm_disk_datastore: vsanDatastore

# VM Network
vm_network_label: Management
vm_network_type: vmxnet3
Now let’s look at a playbook that will use this role:
---
- hosts: linux
  become: no
  gather_facts: False
  roles:
   - vmware_create_virtual_machine
This is a much cleaner playbook than the examples shown previously. The playbook targets the ‘linux‘ group that is defined in the ‘inventory/hosts‘ file and will execute the role ‘vmware_create_virtual_machine‘ against every host that is a member of the target group.
In my ‘linux‘ group I have defined 5 virtual machines.
To deploy the virtual machines using the playbook I can invoke the ansible-playbook command.
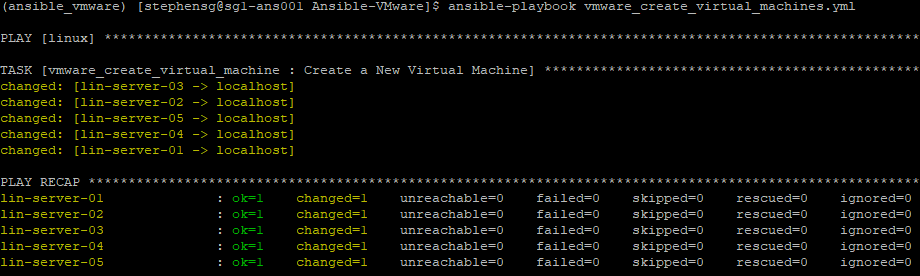
ansible-playbook vmware_create_virtual_machines.yml
We can see that the playbook has been executed against the 5 hosts.
And that the virtual machines have been created in vCenter.
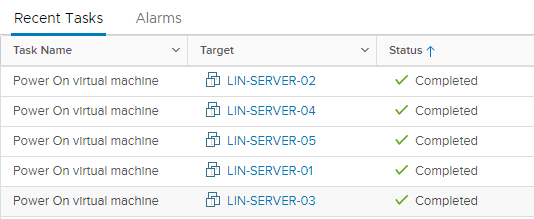
The great thing about Ansible is that it will execute these in parallel.
That brings us to the end of this post. I hope this provides a good understanding of how easy it is to deploy virtual machines and appliances in a vSphere environment using Ansible. Remember, that all my examples can be found on my Ansible-VMware Git repository.
I will update the git repository in due course with some example roles for building machines from templates.
If you experience any issues using these modules or would like some advice on how to build your environment then please feel free to reach out to me using the Drift App, or leave a comment below.
Great post as always…..couple of questions… the Windows VM deployment from a template… what state is that template in ? Is it a generalized O/S ? Also passwords how do we avoid or encrypt passwords in these yml files ?
I always leave the passwords in plaintext just to show the variables etc. But if this were outside of a lab, I would either place the passworded variables in their own YAML file and Ansible Vault encrypt those, or use a secrets manage like Hashicorp Vault. Tower/AWX also allows secure storage of variables that get set to environment variables during runtime. There are so many ways to do this, I typically leave it to the user. I’ll be looking to release a blog post in the future, which will cover different ways that secrets can be managed.
does the process differ for 2016 ? 2016 core ?
Hey Mike. Yeah, I have a 2016 template that worked just fine.
hello,
very informative post, Can we access console of deployed ova using ssh or something like that? if yes how?
Thanks so much GAVIN STEPHENS. Great post.
I would like to ask you; how can you make the Windows server Ansible ready at creation time? If it is possible.
I’m kind of doing same thing in AWS with Ansible AWX and when you create the instance you can run the Ansible ready script passing that on the user_data field at creation time. I would like to start using Ansible with VMWare simulating a data center but I don’t know how to achieve that mentioned task.
Seeking your knowledge on Ansible and VMWare. Thanks in advance.
Best regards.
HI Gavin,
I am very that i successfully implemented the ansible code to deploy vm with template. But i am having a problem with configuring ip address on the virtual machine. Until i login to Console of the virtual machine the scripts are not executing.
Hi. Can you confirm which OS you are trying to deploy? It sounds to me like perhaps you don’t have Perl installed, that is the most common requirement which is missed.
That is Windows VM. Script is working fine until i login to vmware console.
After login to Windows vm through vm console then the script will install the code and restart the vm.
As part of Automation then things should be done automatically
I know the issue you are referring to, I’ve had this exact problem myself. Unfortunately, I can’t remember if I solved or it how. Let me go and do some Windows deployments and see if I still have the issue. Have you tried restarting after the first boot to see if it kicks into action on the second start up?
Yes i restarted the vm. But i am thinking that until we login to vm console using template local admin. The script is getting executed after we start login
Where have you stored the OVA?? On the Ansible Server locally? Bcause in the Example here it is under /mnt/iso
In my example, the OVA’s are stored in /mnt/iso, which for me is an NFS mounted share.
Hi. I have created VM from OVA file . How can I install windows OS using Ansible
Can you deploy an OVA using a URL with ansible instead of static path inside of esxi?
Man, i didn´t find anywhere how to Determine Network, and i found it here \o/. very very very thanks.