Today I started work on something that has peeked my interest for a while, switching my server to CentOS running VirtualBox in headless mode.
I had long been a fan of VMware Workstation, back in the day, it was more feature rich than Vbox and provided better memory management features. Alas, that is not the case today and with VirtualBox’s powerful ‘VBoxManage‘ CLI, it really fits in well where I can write all my infrastructure in code (and yes, I’ll most likely layer Vagrant on top of this). VirtualBox also provides an alternative headless interface ‘VBoxHeadless‘, which means there is no requirement to run a GUI on my server.
As I am starting out on this new journey I felt that it would be great to blog about and hopefully help others that want to do this.
All I have from the start is a minimal installation of CentOS 7.4 (Core). I am using the following as a guide for the VirtualBox installation: https://wiki.centos.org/HowTos/Virtualization/VirtualBox.
Page Contents
VirtualBox Installation
Install Dependencies
Install Extra Packages for Enterprise Linux (EPEL)
# sudo yum install epel-release wget -y
Install Dynamic Kernel Module Support (DKMS)
# sudo yum --enablerepo=epel install dkms -y
This will install quite a few packages:

Install Development Tools
I want my server to have access to a basic development environment so we’ll install the group packages for this. This will install packages such as gcc, make, binutils, etc. Use ‘yum groupinfo “Development Tools“‘ to view the entire list of packages installed in this group.
# sudo yum groupinstall "Development Tools" -y
Install Kernel Development
# sudo yum install kernel-devel -y
Install VirtualBox
Add the VirtualBox package repository
# cd /etc/yum.repos.d
# sudo wget http://download.virtualbox.org/virtualbox/rpm/rhel/virtualbox.repo
Install VirtualBox
# sudo yum install VirtualBox-5.2 -y
This will also install a number of dependencies.
![]()
Install VirtualBox Extension Pack
The VirtualBox Extension Pack will add support for the following:
- USB 2.0 and USB 3.0 Host Controller
- Host Webcam
- VirtualBox RDP
- PXE ROM
- Disk Encryption
- NVMe
Download the extension pack:
# sudo wget http://download.virtualbox.org/virtualbox/5.2.6/Oracle_VM_VirtualBox_Extension_Pack-5.2.6-120293.vbox-extpack
Once downloaded, install the extension pack:
# sudo VBoxManage extpack install Oracle_VM_VirtualBox_Extension_Pack-5.2.6-120293.vbox-extpack
OR, if you are upgrading from a previous version of the extension pack, then you will need to add the ‘–replace’ option to uninstall the old version first.
# sudo VBoxManage extpack install --replace Oracle_VM_VirtualBox_Extension_Pack-5.2.6-120293.vbox-extpack
Agree to the license terms and conditions.
Do you agree to these license terms and conditions (y/n)? y
The extension will be installed.
![]()
Verify that the extension pack has been installed successfully.
# sudo VBoxManage list extpacks
You should see output like the following:

Add Users to ‘vboxusers’ Group
When VirtualBox is installed a new group ‘vboxusers’ is created. Users that are a member of this group will be allowed to run VirtualBox. I will add my non-privileged user to this group.
# sudo usermod -a -G vboxusers stephensg

Verify Installation
VirtualBox Linux kernel module (vboxdrv)
Check that the vboxdrv service has installed correctly and is running.
# sudo systemctl status vboxdrv
You should see output like the following:

The status should be ‘loaded‘ and ‘active‘. If you see a ‘Kernel driver not installed‘ message then try running the following command:
sudo /usr/lib/virtualbox/vboxdrv.sh setup
VirtualBox Web Service (vboxweb)
Check that the vboxweb service is running:
# sudo systemctl status vboxweb-service
You should see output like the following:

Configure VirtualBox
Configure Networking
I have some basic network requirements for my lab to start out with. I will use a host-only interface, which will be the management network and a NAT interface, which can be useful for VMs that I want to access the Internet without going through the virtual firewall. I will also need to bridge one of my virtual firewall’s network interfaces to the servers physical interface (so that I can do some additional routing on my physical network).
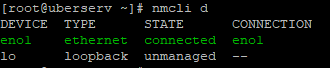
I can see what network interfaces are currently available using nmcli.
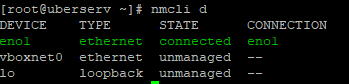
Create the Host-Only Interface
# VBoxManage hostonlyif create

0%...10%...20%...30%...40%...50%...60%...70%...80%...90%...100%
Interface 'vboxnet0' was successfully created
We can confirm that the Host-Only interface was successfully created using nmcli.
Assign Network to Host-Only Interface
# VBoxManage hostonlyif ipconfig vboxnet0 --ip 10.1.10.1 --netmask 255.255.255.0
To confirm that the IP address has been assigned, use the ip command.
# ip address show dev vboxnet0

3: vboxnet0: <NO-CARRIER,BROADCAST,MULTICAST,UP> mtu 1500 qdisc pfifo_fast state DOWN qlen 1000
    link/ether 0a:00:27:00:00:00 brd ff:ff:ff:ff:ff:ff
    inet 10.1.10.1/24 brd 10.1.10.255 scope global vboxnet0
       valid_lft forever preferred_lft forever
Create NAT Interface
I want to create a NAT network on 192.168.15.0/24 and have IP addresses allocated to clients automatically using DHCP.
# VBoxManage natnetwork add --netname natnet0 --network "192.168.15.0/24" --enable --dhcp on
To confirm that the NAT network has been created use the following command.
# VBoxManage natnetwork list

NAT Networks:

Name:        natnet0
Network:     192.168.15.0/24
Gateway:     192.168.15.1
IPv6:        No
Enabled:     Yes

1 network found
We can see that the network has been created and an IP address has been allocated automatically for the gateway (uses the first available address). This should be enough to provide outbound Internet access to any VM NICs attached to this interface.
Global Settings
I also like to configure some global settings so that I do not need to keep specifying these when creating new virtual machines.
Default Virtual Machine Folder
I actually have 2 large SSDs that I spread the VMs across for IO reasons. I will default to one of these and manually specificity my second disk when required.
# VBoxManage setproperty machinefolder /mnt/vm1/vbox/vm
Exclusive Hardware Virtualization
VirtualBox will be given exclusive use of the hardware virtualization extensions (Intel VT-x or AMD-V). I think this defaults to on but let’s set it anyway.
# VBoxManage setproperty hwvirtexclusive on
Default Front End
I am not running a GUI on this server so all virtual machines will be running in headless mode.
# VBoxManage setproperty defaultfrontend headless
That concludes my initial setup and now I am ready to start deploying my virtual machines. I will provide posts on my new virtual machine deployments as I build out my new infrastructure using VirtualBox. I also have a number of OVF’s that I exported from my old environment that I’ll be importing and will document the steps along the way.
Awesome !
Excellent work. Thank you!
Great Job